Trigger & Trigger Guard Installation:
Before starting this area, I needed
to cut the belly of the forearm down so it was 1/8" below the ramrod hole
at the rear thimble and 3/16" below the ramrod hole at the lock. Once this
was done, the bottom was squared to the side using a file and a square. 
With the sear located, a mark was made 1/4" in front of the sear. This is where the front trigger will be. Using a measuring stick, I laid it on the stock measured back 13-5/8" to the rear of the stock. Where this mark is, will be the rear of my butt plate. The butt plate was then laid out onto the stock and a pencil mark made. Then I made a parallel line that was 1/16" outside of these because I will be inletting the buttplate down and forward into it's final location. Also, the heel of the buttplate will tell me where the rear bottom of the rifle stock will be.
 I
used the trigger plate as a template to draw the curvature of the wrist
area. You will also note, a 3/32" hole was drilled into the bottom of
the wrist area to both check the function of the lock to insure there was not
any wood interfering with the operation of the lock and aid in properly locating
the sear of the lock.
I
used the trigger plate as a template to draw the curvature of the wrist
area. You will also note, a 3/32" hole was drilled into the bottom of
the wrist area to both check the function of the lock to insure there was not
any wood interfering with the operation of the lock and aid in properly locating
the sear of the lock.
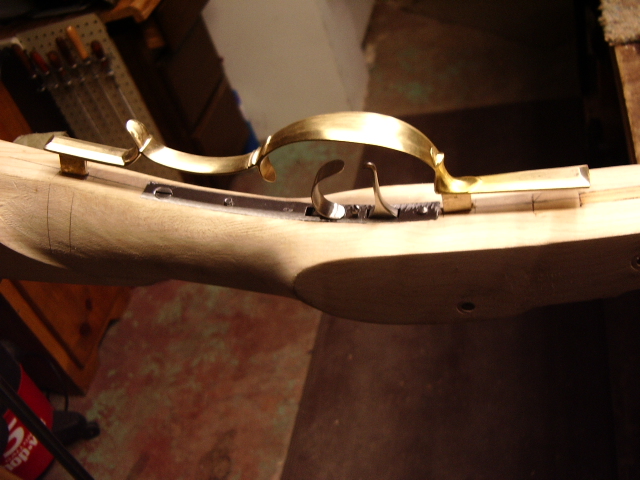
I also laid out the trigger guard on top of the set triggers to determine where the trigger plate needed to be shortened. Also determined where the tang bolt was passing thru the stock to make sure there was sufficient amount of steel available in front of the triggers. Once this was all determined, marks were made on the trigger plate. See the photo.
At first, I was debating about telling ya'll about the latest dilemma. Sometimes things happen you do not plan. If you recall, I said it was important to make sure your ramrod channel was grooved out to 25/64" prior to drilling? Well, I did not. In that case, the drill did not lay flat all the way down in the ramrod groove. With this being a hard stock, the drill drifted toward the belly. When I discovered this, I plugged the ramrod hole with a glued in dowel and redrilled the ramrod hole. The second hole turned out great!
However, when removing the wood as
stated above in the first paragraph on this page, WHOA what a discovery I
saw. You will have to click on this LINK
to see what I saw. The dark line down the center is the center line I
drew. Note, this is a gun for myself and I'll salvage it. If it was
for a customer, I would "eat the stock" and reorder another
stock. So as this gun progresses, you will also see me install a forearm
inlay between the trigger guard and the rear thimble. Should be an interesting
project, eh?
 With
the the lower belly of the butt stock cut down and
the butt plate area cut out, I wanted to install the butt plate to protect the
toe of the stock and prevent it from chipping whilst handling the stock. See Butt
Plate Installation:.
With
the the lower belly of the butt stock cut down and
the butt plate area cut out, I wanted to install the butt plate to protect the
toe of the stock and prevent it from chipping whilst handling the stock. See Butt
Plate Installation:.
With the butt plate installed, let's get back
to the triggers. (Sorry, I took pictures of the process and they disappeared.)
The trigger plate was cut to the previous marks. Note, the ends were cut at a
bevel so as to be inlet better. You can see this on the original trigger plate
above. A center line was drawn down the belly of the stock. The trigger plate
was laid on top of this line. Using the sear hole in the stock, I aligned the
set screw hole up with it. I marked the front end of the trigger plate on the
stock with my knife and a pencil for the rear. Then I measured the width
of the plate. Divided this measurement across the center line (a little toward
the lock - 1/16"). Drew two parallel lines on the stock. Using my
knife, I cut on the inside of these lines. "V" cut these lines on the
inside and used my 1/4" chisel to deepen the lines. A small gouge was
used to remove the wood between the lines and cleaned up the waste with my
5/16" knife.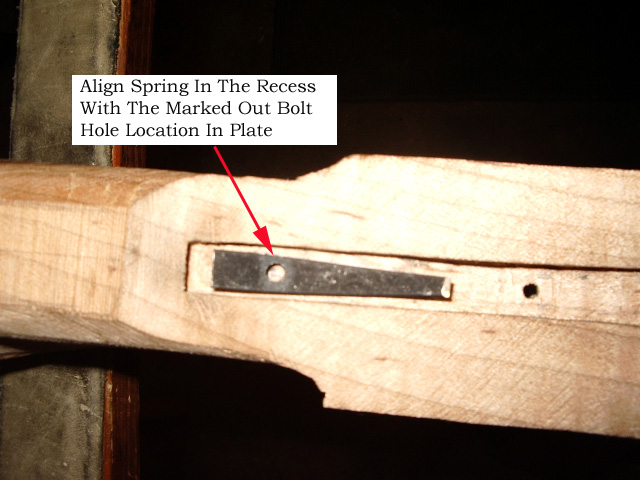
The plate alone was inletted first. Then the triggers were installed and inletted. Lastly the springs were installed and inletted. To make it easier, I marked the location of the spring screw thru the plate and made a shallow hole for the screw head. You can also lay the spring in the recess and trace it out to inlet. This was similar to how the Marshall Rifle was done.
Once inletted, I drilled 1/16" hole to the rear of the plate and then remounted the plate in the stock and drilled into the stock where the 1/16" hole was, into the stock. Removed the plate and made a clearance hole for the #6 screw.
Now I needed to locate the front tang hole in the trigger plate. This had to be far enough ahead of the front trigger, so as not to interfere with the trigger. Once determined, a shallow 3/32" hole was drilled in the exposed face of the trigger plate. To drill the tang hole, I made a small jig to serve as an aid to drill the tang hole. (For more information on the jig and how to make it, click on this link: Making The Tang Bolt Jig: in the Tips & Aids section.
 Then with the jig set up, I placed the rifle on
the jig.
Then with the jig set up, I placed the rifle on
the jig. It was important to orientate the rifle, so the head of the tang bolt was perpendicular
to the face of the barrel tang. I drilled 1/2 - 3/4 the way thru from the
top and then flipped the rifle over and did the same thru the 3/32" hole I
had on the other side. The two holes matched up perfectly.
It was important to orientate the rifle, so the head of the tang bolt was perpendicular
to the face of the barrel tang. I drilled 1/2 - 3/4 the way thru from the
top and then flipped the rifle over and did the same thru the 3/32" hole I
had on the other side. The two holes matched up perfectly.
Since I'm using a #8 tang bolt, I redrilled the hole with a #29 drill bit. Removed the trigger plate and then drilled the hole again from the top with a clearance bit (13/64") for the bolt and the tap.
The trigger plate was reinstalled. The 8x32
tap was placed in thru the top hole in the tang and I tapped the hole in the
trigger 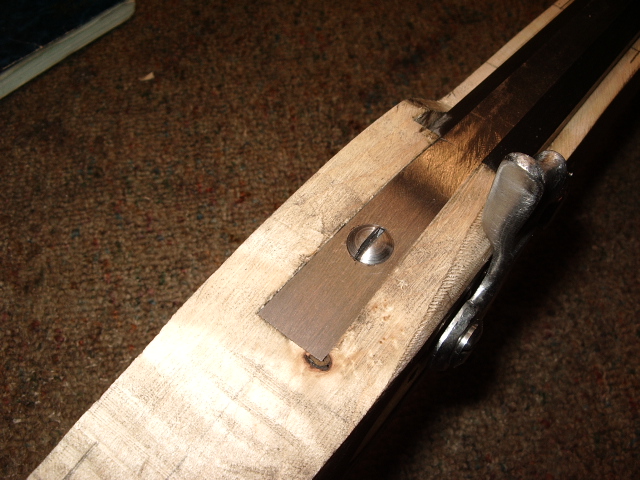 plate
below. Once this was done, I beveled the top
plate
below. Once this was done, I beveled the top 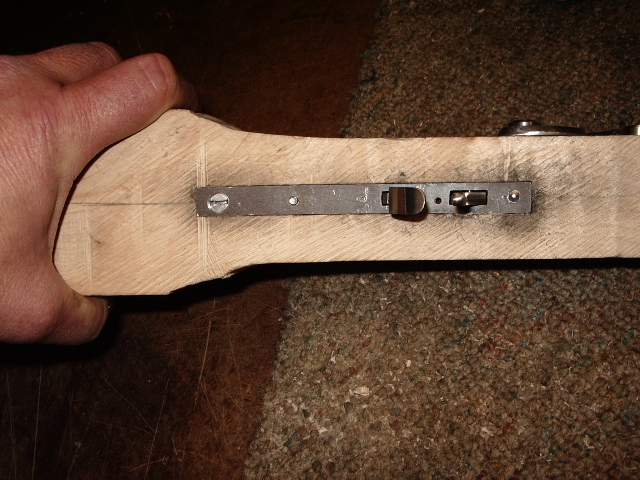 hole
for the tapered tang bolt head until it fit flush. The excess threads of
the tang bolt were marked and then cut off. The end of the exposed bolt was
rounded over. You want about 2 - 3 threads left exposed.
hole
for the tapered tang bolt head until it fit flush. The excess threads of
the tang bolt were marked and then cut off. The end of the exposed bolt was
rounded over. You want about 2 - 3 threads left exposed.
Now you have the rifle "Buttoned Up"
and the triggers installed. 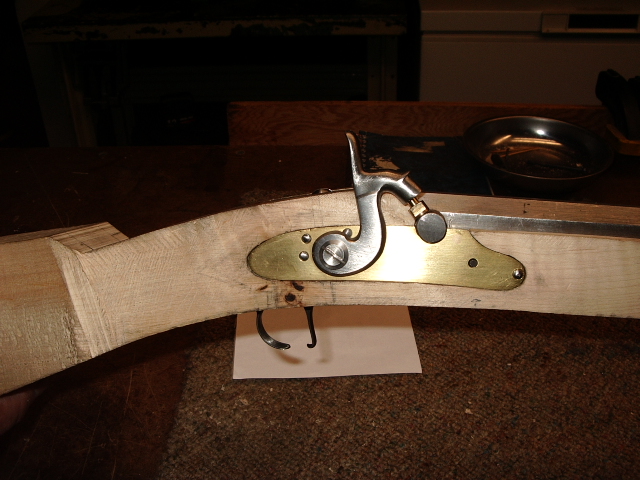
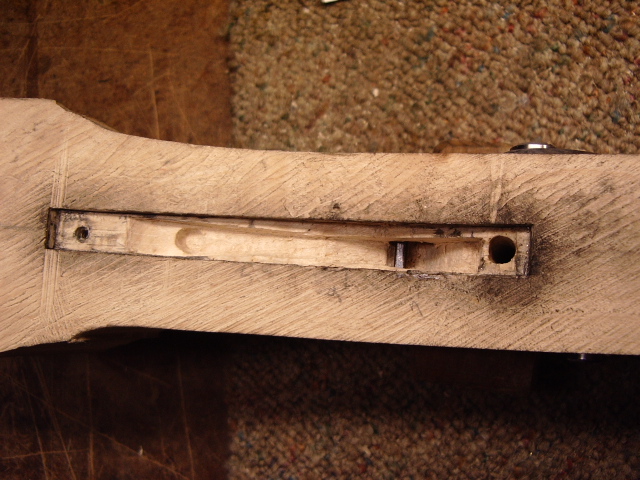
Here is a photo of the inletted trigger area.
Now I will work on the thimble installations next. See Installing Thimbles:
With the thimbles inletted, I shaped the forearm and then made and installed the Nose Cap.
With the Nose Cap now installed, I'm ready to install the trigger guard. Before installing the trigger guard, I clean it up using needle files and sand paper backed with a popsicle stick or small dowel. I use 60-80 grit to remove the file marks and work my way up to 300 grit for now.
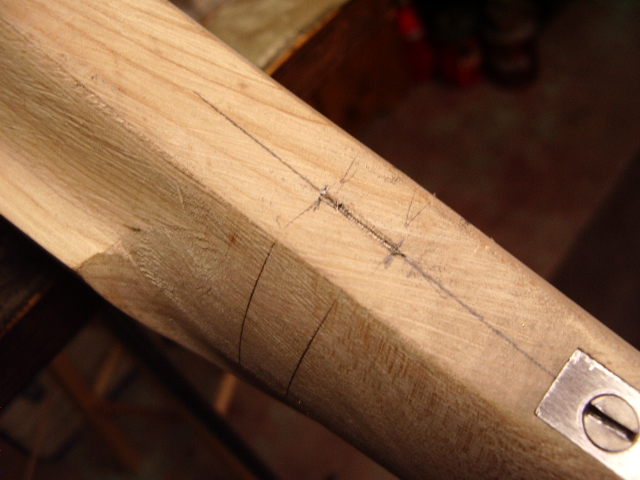
 I
position the triggerguard over the set triggers. With a pencil, I mark out where
the two tabs are on the guard, onto the stock. Also, you need to draw a center
line down the stock to center the guard on the belly of the stock. You will
note, I drew lines down the side of the stock for the rear tab. This
gives me a proper perspective on how to angle the drill when drilling the holes.
I
position the triggerguard over the set triggers. With a pencil, I mark out where
the two tabs are on the guard, onto the stock. Also, you need to draw a center
line down the stock to center the guard on the belly of the stock. You will
note, I drew lines down the side of the stock for the rear tab. This
gives me a proper perspective on how to angle the drill when drilling the holes.

I use masking tape on the bit to limit my depth.
Use a "V" carving tool
along the line the tab is positioned. Then drill a hole to the depth of the
tab. A series of holes are drilled along the line. I generally will drill
a hole at each end of the line and then drill the remainder of the holes between
to remove as much wood as necessary. Using my knife and chisels, I remove the
wood from the slotted hole. Then I continue to inlet the trigger guard
into the stock about 1/32". Once fully seated, I clamped the guard into the
stock firmly and then I drilled a hole thru the stock, the tab on the guard and
out thru the other side of the stock. In this case, I wanted to conceal the pin
inside the lock panel area. 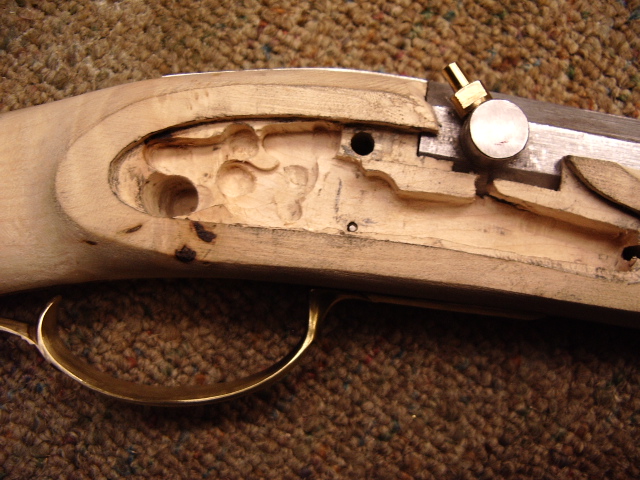
Here is a photo of the "V" channel for the rear tab.
Then I drilled the holes along
this line. 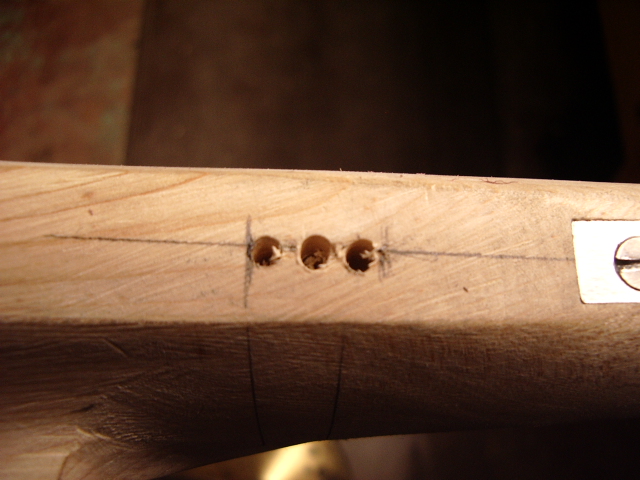 With
the wood removed, I then inlet the rear end of the guard into the stock. I
measured the depth of the tab and transferred this to the
With
the wood removed, I then inlet the rear end of the guard into the stock. I
measured the depth of the tab and transferred this to the 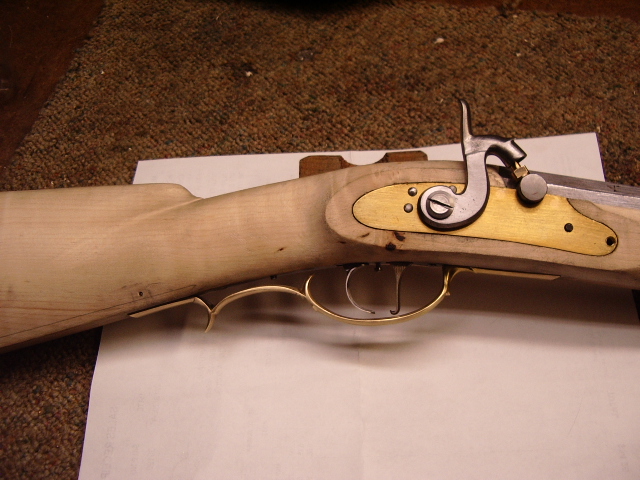 stock.
This aided me in knowing the height of the tab. Next I drafted the incised
line I want to put along the lower edge of the butt stock and drilled my hole
for the rear tab slightly above this line. The higher I put the pin, the
stronger the rear trigger guard will be secured.
stock.
This aided me in knowing the height of the tab. Next I drafted the incised
line I want to put along the lower edge of the butt stock and drilled my hole
for the rear tab slightly above this line. The higher I put the pin, the
stronger the rear trigger guard will be secured.
Here is another view of the
trigger guard in position. 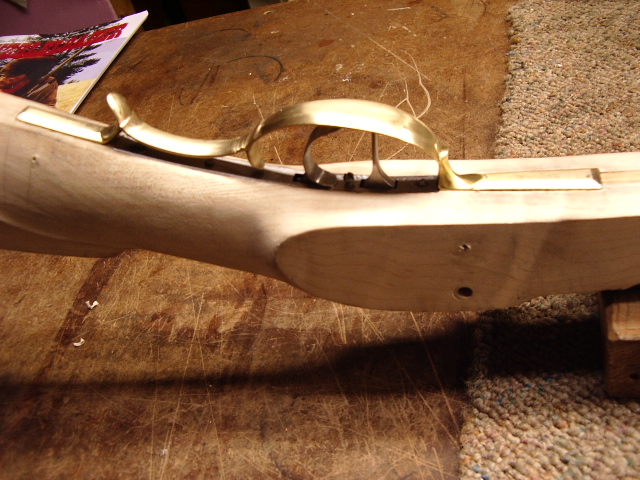
With the trigger guard now in place, I measured 1/8" on either side of the trigger guard tail and made a mark on the stock. Then I drew a line from this mark to each side of the exposed butt plate. This will be the width of the belly of the butt stock. Wood was removed on either side along this line to define this.
Now I will make a toe plate for the rifle and install this next.
Hoot AL Rifle Shop
If you like the site or have any questions, drop me a line by clicking on "Hoot" below.

(c) Copyright 2005. All Rights Reserved.
If you like the site or have any questions, drop me a line by clicking on "Hoot" below

(c) Copyright 2005. All Rights Reserved.