Installing A Wooden Patchbox Lid: {Click on photos below for larger image.)
 Here
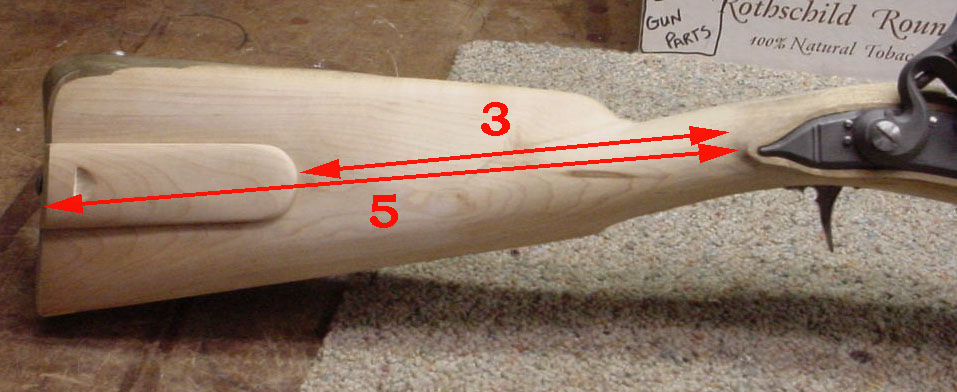
is the finished patchbox lid installed with latch spring. Note; I used my
Golden Mean dividers and to mark out for you how I determined the
length of the patchbox lid for this rifle.
Here
is the finished patchbox lid installed with latch spring. Note; I used my
Golden Mean dividers and to mark out for you how I determined the
length of the patchbox lid for this rifle.
The "5" measurement is from the end of the lock panel to the end of the butt. When I flipped over my dividers, and measured from the end of the lock panels it marked out where the end of the patchbox should end. Pretty simple, eh? Check out my write up on the Golden Mean.
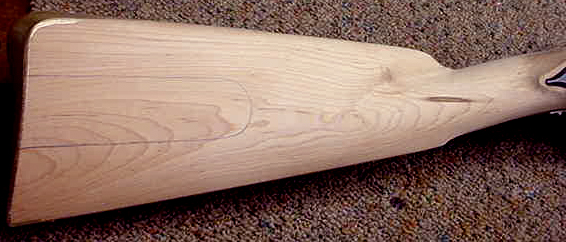 The patch box side of the stock was cleaned up. Note; on both of the photos of
the butt stock, I shaped the comb of the stock and defined it at the wrist
junction. Also, I made a paper pattern of the patch box lid and laid it
out on the side of the stock. This area will then be flattened with a file and
sanded smooth with 400 grit paper in preparation for the patchbox dovetails and
the matching lid. This is when the fun begins.
The patch box side of the stock was cleaned up. Note; on both of the photos of
the butt stock, I shaped the comb of the stock and defined it at the wrist
junction. Also, I made a paper pattern of the patch box lid and laid it
out on the side of the stock. This area will then be flattened with a file and
sanded smooth with 400 grit paper in preparation for the patchbox dovetails and
the matching lid. This is when the fun begins.
I
decided to build a 2 piece wooden patchbox lid. The first step was to measure out
the length of the slider (bottom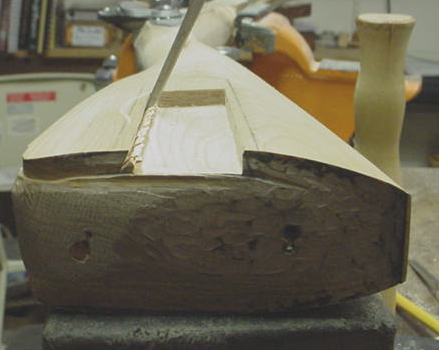 half) at 3.5". the top of the slider would be 1/8"" inside the
lid along the sides. Note: I made the nose of the slider a 1/16" narrower
than at the buttplate. This makes for a more secure fit and will keep the lid
from rattling around. I then cut out this area after removing the butt
plate. Took it down to a depth of 1/4" with squared sides. Once the sides
were squared, I then drew a 60 degree angle inward from the top of the slider to
act as a guide for my chisel so I could cut the dovetails into the sides.
I did this along both sides.
half) at 3.5". the top of the slider would be 1/8"" inside the
lid along the sides. Note: I made the nose of the slider a 1/16" narrower
than at the buttplate. This makes for a more secure fit and will keep the lid
from rattling around. I then cut out this area after removing the butt
plate. Took it down to a depth of 1/4" with squared sides. Once the sides
were squared, I then drew a 60 degree angle inward from the top of the slider to
act as a guide for my chisel so I could cut the dovetails into the sides.
I did this along both sides.
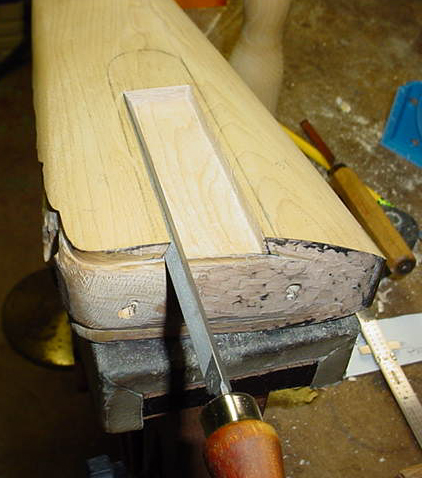 Next
I used a "safe" triangular file. This is a file with at least one side
is void of file teeth. This allowed me to cut into the dovetail and not dig into
the floor of my slider area.
Next
I used a "safe" triangular file. This is a file with at least one side
is void of file teeth. This allowed me to cut into the dovetail and not dig into
the floor of my slider area.
I
filed the sides until the top of the triangular file was mated to the top edge
of the slider dovetail. 
Next I measured the bottom inside of the slider and cut out a piece of hard maple to these measurements (make it about 1/2" too long) and next cut the male dovetails on the slider.
 I inserted the leading edge of the slider into the female dove tails for fit.
You may want to try a scrap of wood to get the correct angle. If you use a band
saw to cut the dovetails; set the saw table at 25 degrees. Now carefully work
the piece into till tight. Remove and adjust the slider to fit. TAKE YOUR
TIME!! Use a piece of typewriter carbon paper to make the marks and then remove
the unnecessary wood. Remember, the nose of the slider is narrower than at
the butt plate.
I inserted the leading edge of the slider into the female dove tails for fit.
You may want to try a scrap of wood to get the correct angle. If you use a band
saw to cut the dovetails; set the saw table at 25 degrees. Now carefully work
the piece into till tight. Remove and adjust the slider to fit. TAKE YOUR
TIME!! Use a piece of typewriter carbon paper to make the marks and then remove
the unnecessary wood. Remember, the nose of the slider is narrower than at
the butt plate.
I
continued this until I had a nice fit and slide was all the way in into the
cavity. 
 Place masking tape onto the stock around the
slider and then flatten the slider to mate with the flattened surface on your
stock. Next step is to cut out the patchbox lid to your pattern and then glue
the two pieces together.
Place masking tape onto the stock around the
slider and then flatten the slider to mate with the flattened surface on your
stock. Next step is to cut out the patchbox lid to your pattern and then glue
the two pieces together.
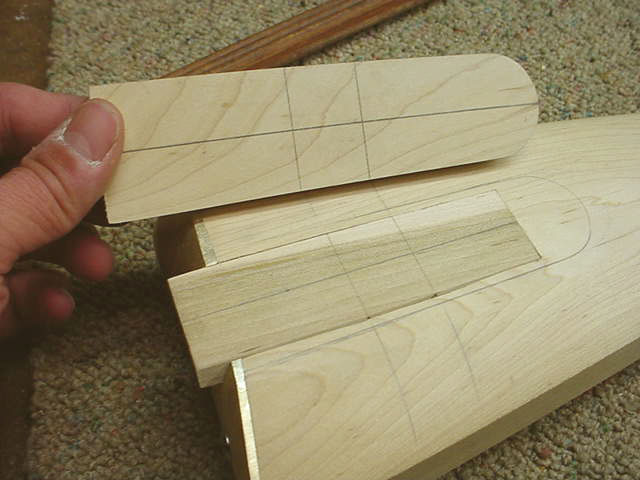
After the lid is cut out, I draw lines perpendicular across the base and a center line.
 I draw a center line on the bottom of the lid. Lay the lid into position on the
stock and mark where the perpendicular lines are on the stock. Lay the lid on
top of the base and matched up all the lines. then I glued the lid to the base
by again matching up the lines.
I draw a center line on the bottom of the lid. Lay the lid into position on the
stock and mark where the perpendicular lines are on the stock. Lay the lid on
top of the base and matched up all the lines. then I glued the lid to the base
by again matching up the lines.
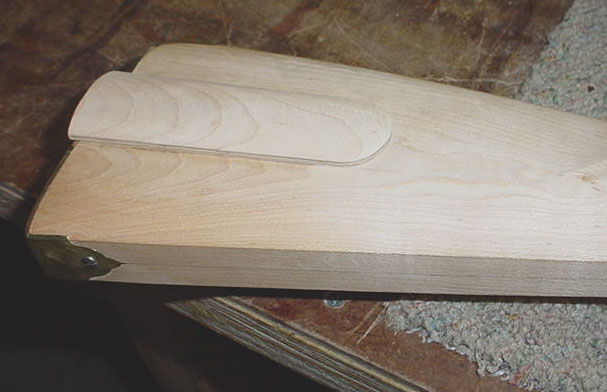
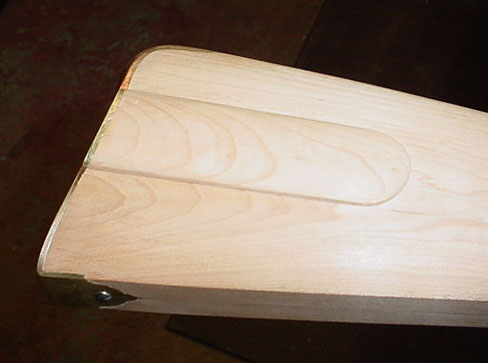
I drew a line 1/16" all around the base of the lid. Then I drew a sloping line along the sides of the lid, with the rear end of the lid at the butt plate measuring 5/16" toward the front measuring 1/8" high. Then I rounded the top of the lid. I divided the width into fifths and then rounded it over.
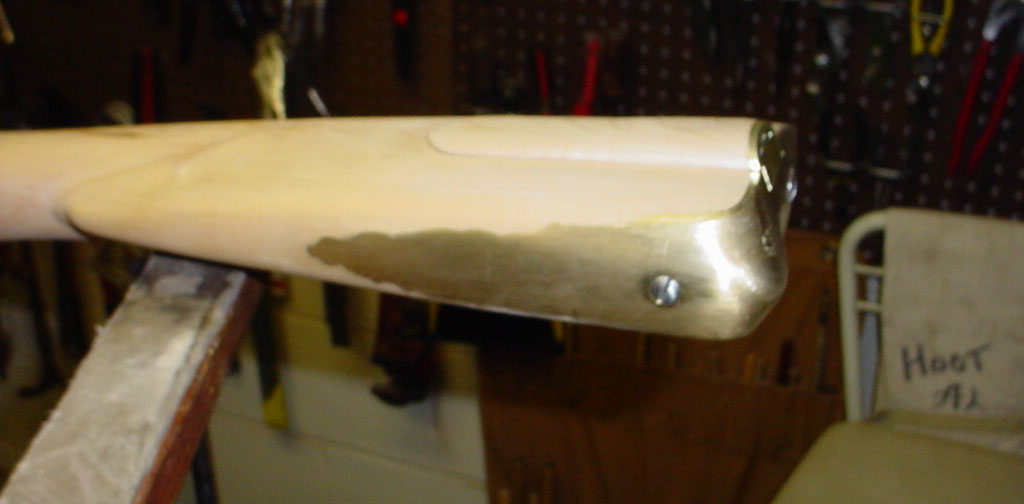
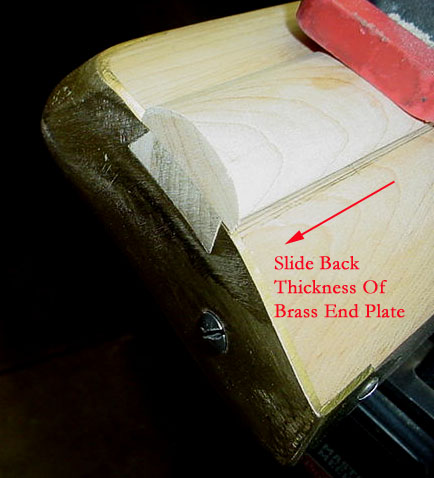 Then I slid the lid back toward the butt plate
the thickness
Then I slid the lid back toward the butt plate
the thickness
 of
the brass end plate.
of
the brass end plate.
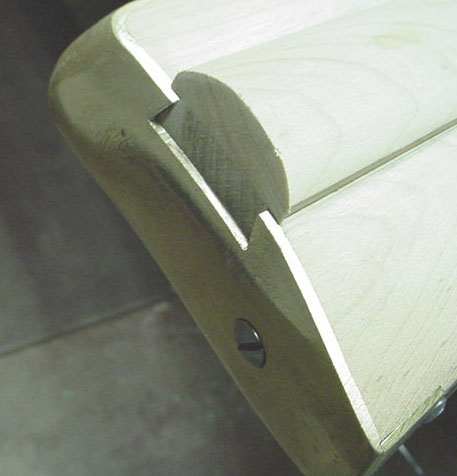
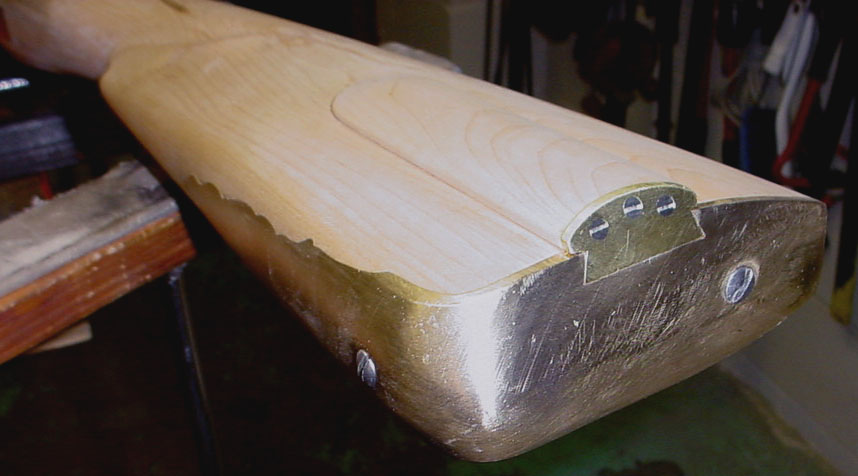 Then I cut the brass end plate larger than the
end of the lid. Secured it to the lid with three #4 screws and then carefully
inlet it into the butt plate.
Then I cut the brass end plate larger than the
end of the lid. Secured it to the lid with three #4 screws and then carefully
inlet it into the butt plate.
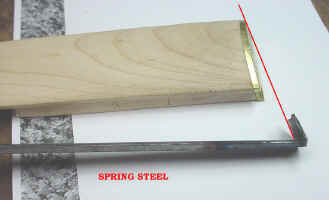
First step was to get a piece of spring stock that was 3/32" thick.

Next I centered the steel over the lid and scribed a line 1/4" from the end. Then put it into vise and peened the end over to match the sloped end of the lid.
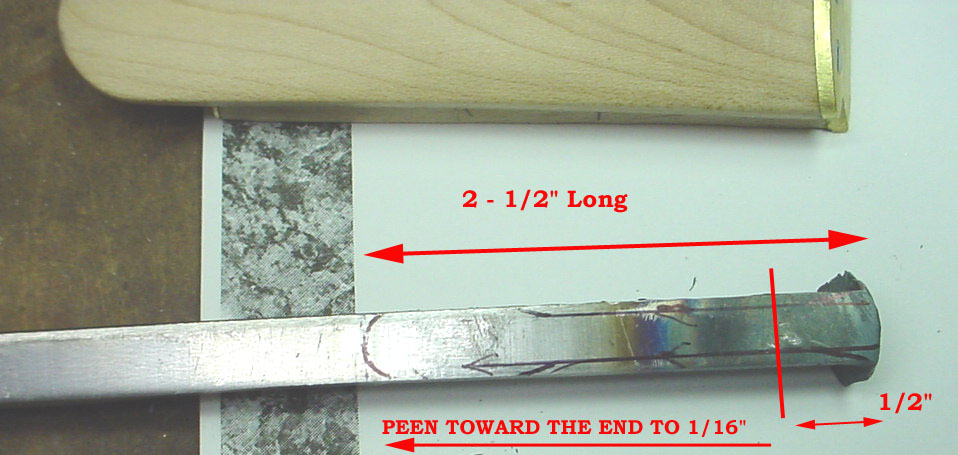
Measured the length of the spring to be 2-1/2" and cut it to length. Once cut to length, I placed a mark 1/2" from the tabbed over end of the spring. From here I peened the metal down to a thickness of approximately 1/16" thick. With the metal now swaged out, I located a hole for my #4 screw. Drilled a passage hole and then drew a perimeter circle of 1/8" around the screw hole. Then I shaped the end of the spring around the hole.
Once completed, I inlet the spring flush into the lid. This resulted in having to remove some of the brass on the end of the lid underneath the spring. In order to locate the latch point, I removed wood in the stock about 5/8" long by the width of the spring. This allows the spring to lower itself enough to catch the edge of the butt plate.
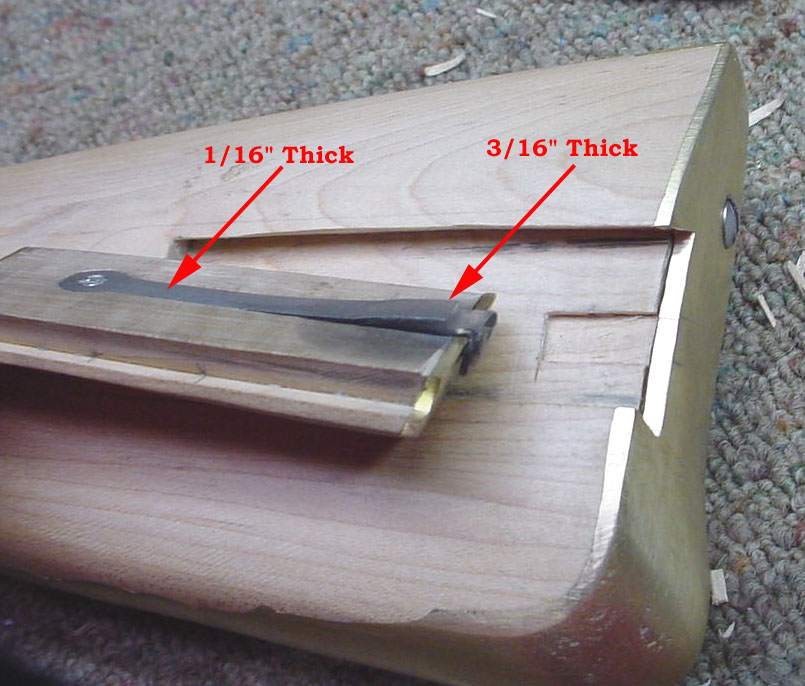
I then inserted the lid into the stock fully. At that point I scribed a line underneath the bent over tab of the spring along the exposed edge of the butt plate. This gave me an edge to measure from to give me some bearings on where the inner edge of the butt plate was. Then I measured the thickness of the butt plate at this point and transferred this to the line I previously scribed on the bottom of the spring tabbed end and scribed another line. Using a "safe-file" I proceeded to file the notch into the bottom flat of the tabbed end. I filed up close to the line and quit, and through a process of trials I was able to finally hear the latch "snap" into position.
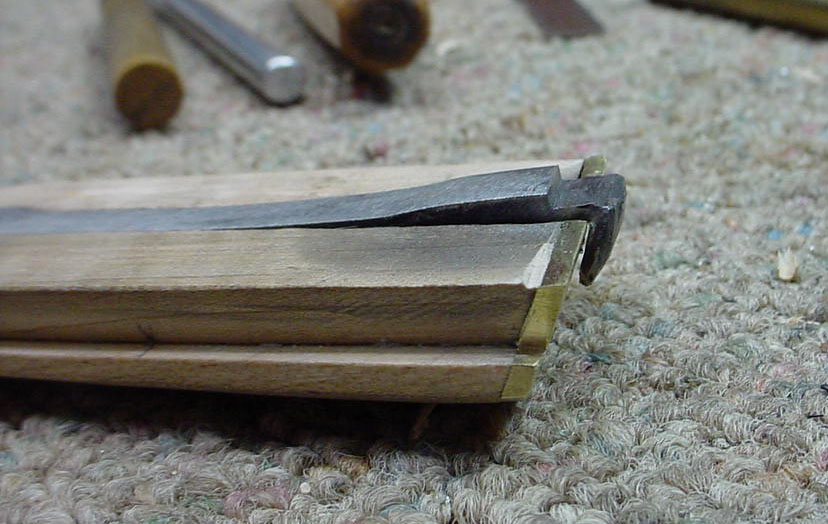
 With the latch properly located, I then filed and rounded the exposed tab on the
end of the spring. Next step was to cut in a recess into the top of the lid to
allow a place for the finger tip to grasp the lid so the thumb could lift the
tab and then slide the lid off the stock. I kept it simple, since guns of this
time period were kept simple yet functional. Plus, this is going to be a
hunting gun and needs to practical.
With the latch properly located, I then filed and rounded the exposed tab on the
end of the spring. Next step was to cut in a recess into the top of the lid to
allow a place for the finger tip to grasp the lid so the thumb could lift the
tab and then slide the lid off the stock. I kept it simple, since guns of this
time period were kept simple yet functional. Plus, this is going to be a
hunting gun and needs to practical.
 The
next step was to cut out the patchbox cavity. The length of the cavity was
2-5/8" long X 7/8" wide X 3/4" deep. The inside corners of the
box were rounded. Patchbox cavities during this time period ranged from being
poorly carved out to rounded corners. Few had squared off corners.
The
next step was to cut out the patchbox cavity. The length of the cavity was
2-5/8" long X 7/8" wide X 3/4" deep. The inside corners of the
box were rounded. Patchbox cavities during this time period ranged from being
poorly carved out to rounded corners. Few had squared off corners.
Hoot AL Rifle Shop
If you like the site or have any questions, drop me a line by clicking on "Hoot" below.

(c)
Copyright 2005. All Rights Reserved.
(