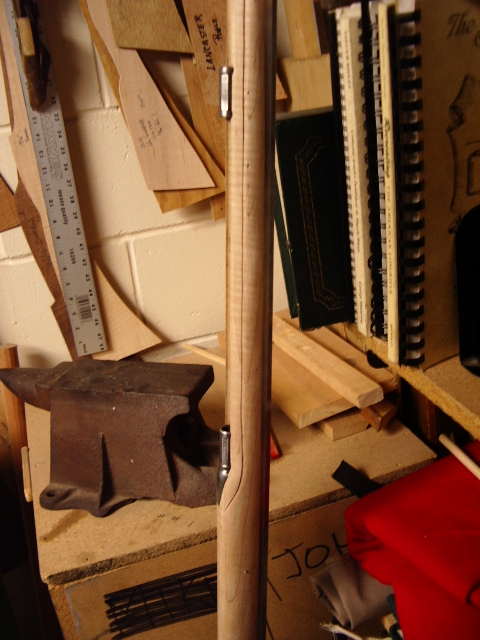
Shaping The Stock:
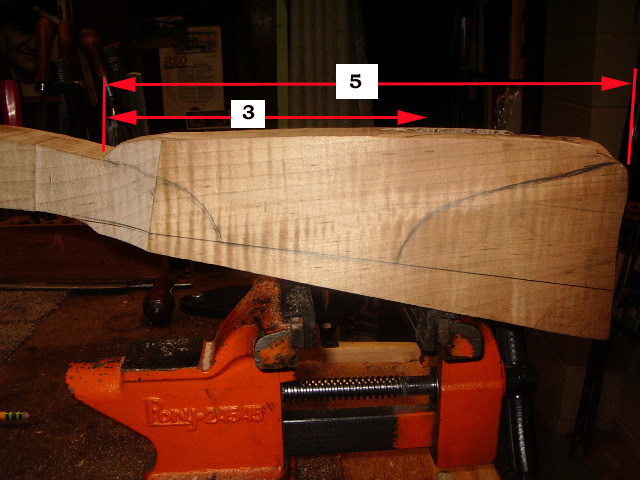
With the buttplate on, I positioned the trigger guard where it will be located. Then I made marks on either side of the trigger guard (1/16" on either side). With a ruler, I drew lines from these marks to the outside bottom sides of the buttplate. This draws out my toeplate width and the bottom of the stock.
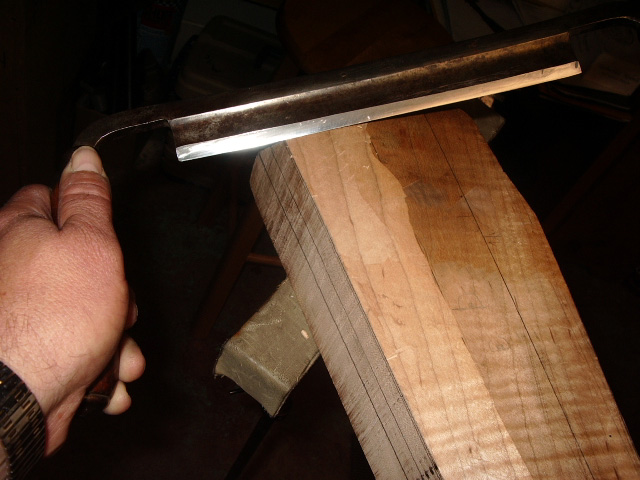
Next I divided up the side of the stock into three quadrants. Using a drawknife, I removed wood to these lines.
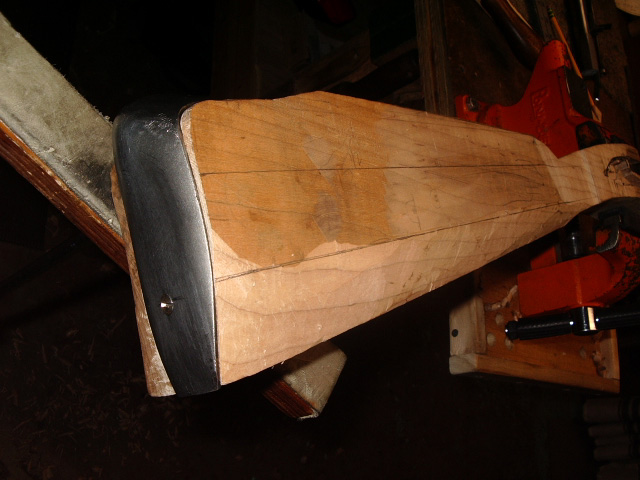
Using a wood file, I the rounded the top two
edges down to the buttplate level. 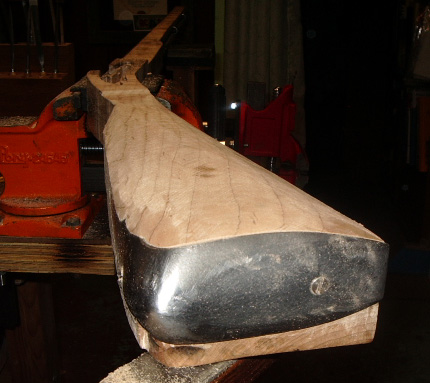
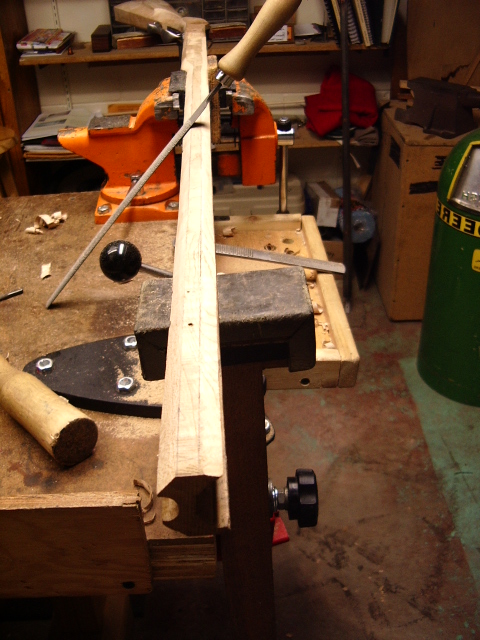
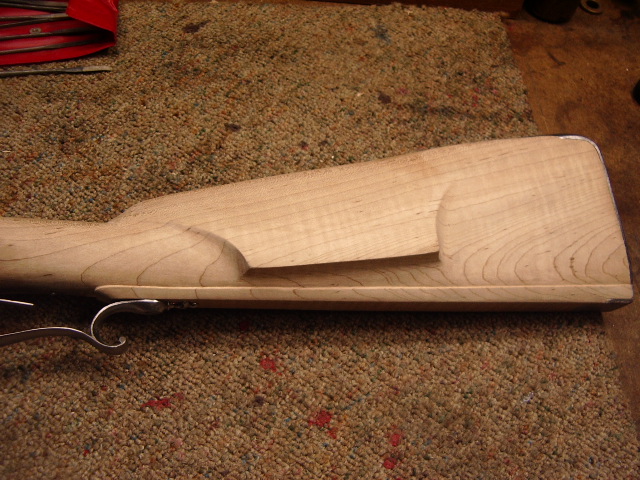
Next step is to draw out the cheekpiece. Note; on this gun, we are trying for a 16" pull, so the cheekpiece will be slightly off set. Used the Golden Means to determine the back edge of the cheekpiece. In this case we ended up with a cheekpiece that was 4-1/2" long.
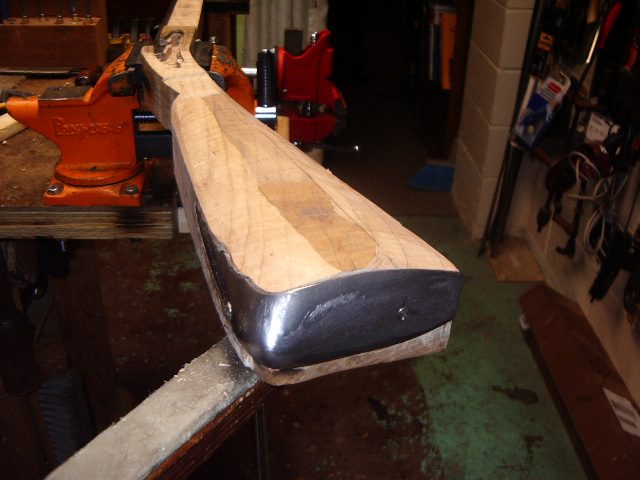
 Here is the roughed out cheek piece.
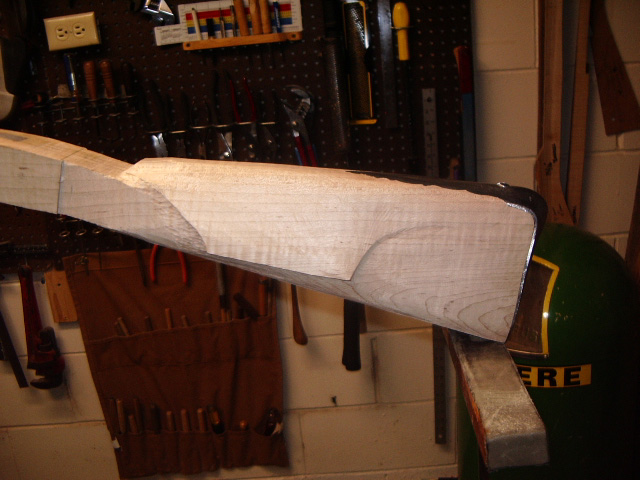
Here you can see the stock was taken down to the width of the buttplate and the comb is still in a roughened state yet.
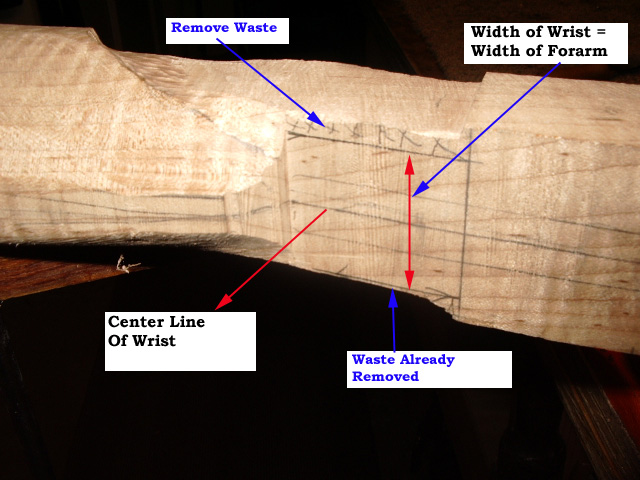
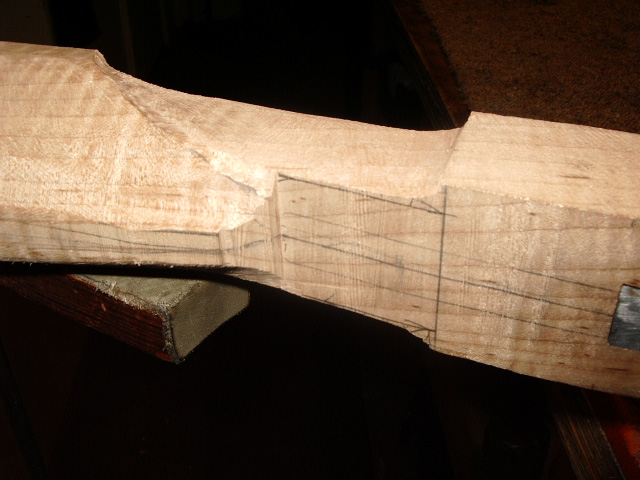
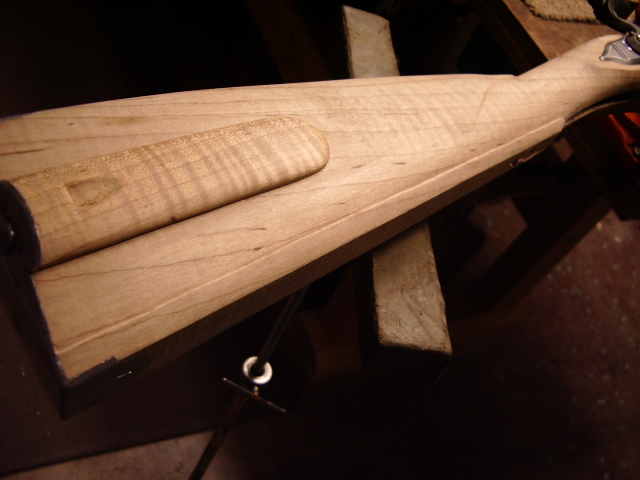
I decided to take the width of the wrist down to the same width as the forearm. I measured the width and divided this measurement across the center line of the wrist and removed wood up to these lines. This gave it better proportions and brought me closer to the end of the comb on the stock. At this point, I can tell how much of the wrist stock will be blending into the butt stock. Here are couple photos showing what I did.
When we get the lock, the lock panels will be taken down to proper depth, the lock panels will be shaped and then the wrist.
At that point the wrist and front of the comb will be married together. The cheekpiece is still a little thick yet, too. With the lock panel and side plate panels shaped, now I can work on the wrist area again.
I divided the top and sides
of the wrist into five sections each. 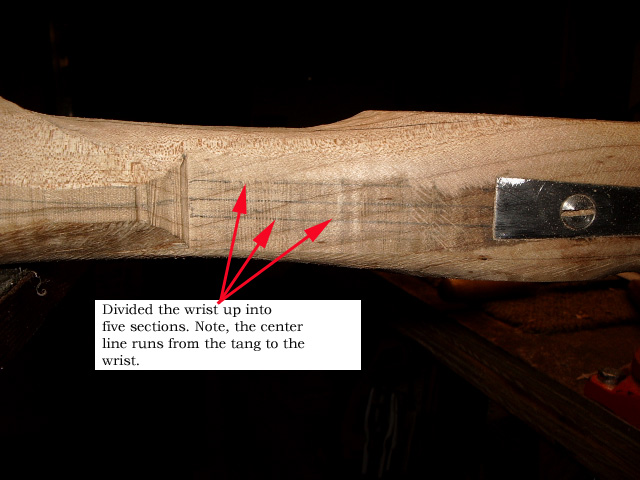
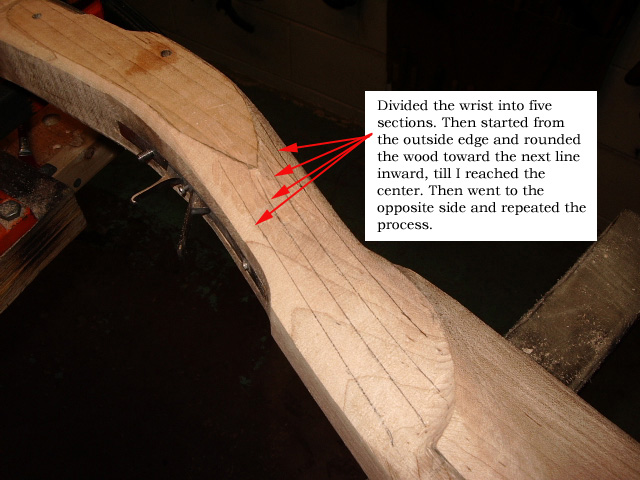
Then I used a wood rasp by filing and rolling the file toward the next line inward. I started with the outside lines and worked toward the center, doing only one section at a time.
 For
the cheek, I wanted to dish out the stock above the cheek. also I wanted the
cheek to blend in with the wrist and the remainder of the stock. This is
still in the rough, but wanted to give you a general idea..
For
the cheek, I wanted to dish out the stock above the cheek. also I wanted the
cheek to blend in with the wrist and the remainder of the stock. This is
still in the rough, but wanted to give you a general idea..
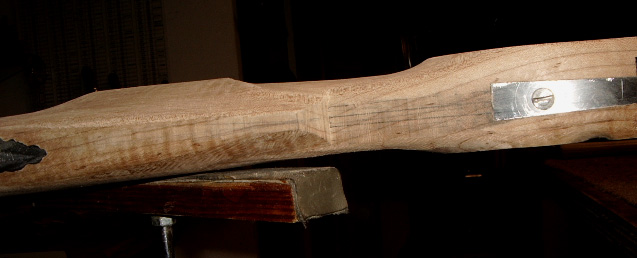
Here
is a more recent photo of the wrist and the cheek. 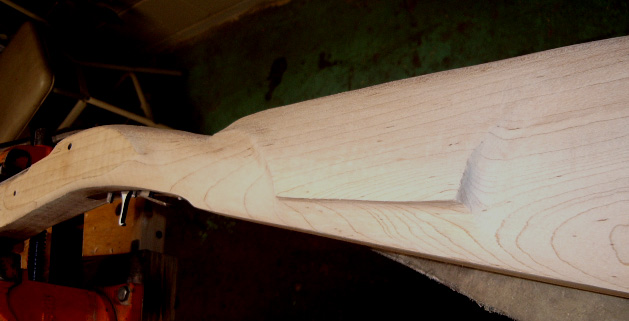
Now
I want to flatten the stock side opposite of the cheek so I can lay out the
other side of the comb. To do this, I take a steel 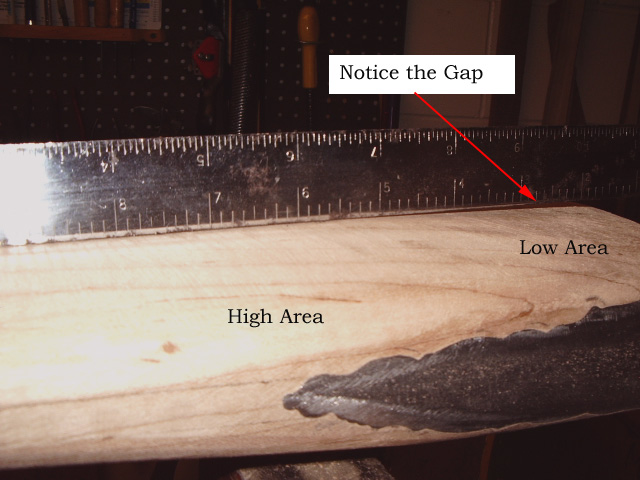 ruler
and sit it on the stock to see it there is a gap. In this case, I can see
a high spot in the center of the stock and a gap by the buttplate.
ruler
and sit it on the stock to see it there is a gap. In this case, I can see
a high spot in the center of the stock and a gap by the buttplate.

Then I take the same ruler and rub the edge with a black wax pencil.
Next
I take the ruler and place the edge of the ruler with the black wax edge down
and rub the steel back and forth across the stock. This leaves me a mark
pointing out the high spots on the stock. Using my bastard file, I 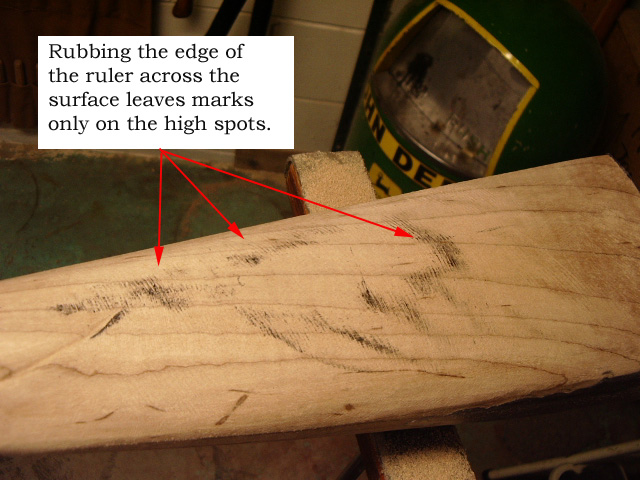 then
file these marks away and continue the process until I have a even mark from the
buttplate to the wrist area.
then
file these marks away and continue the process until I have a even mark from the
buttplate to the wrist area.
With
the side of the stock now even, I take a piece of notebook 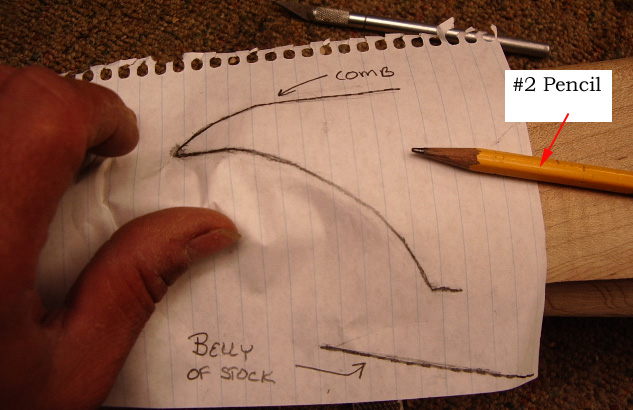 paper
and lay it on the cheek side of the stock and define the top of the comb and
push the paper flat down to locate the bottom of the stock. Using the pencil, I
rub a #2 pencil on the paper. This leaves a nice mark. Then I continue by
rubbing the cheek edge up to to the comb area.
paper
and lay it on the cheek side of the stock and define the top of the comb and
push the paper flat down to locate the bottom of the stock. Using the pencil, I
rub a #2 pencil on the paper. This leaves a nice mark. Then I continue by
rubbing the cheek edge up to to the comb area.
Using
my universal rubbing tool (Popsicle stick) I flip the stock over; reverse the
paper with the pencil marks down. Locate the top front edge of the comb and the
belly of the stock. Grasp the 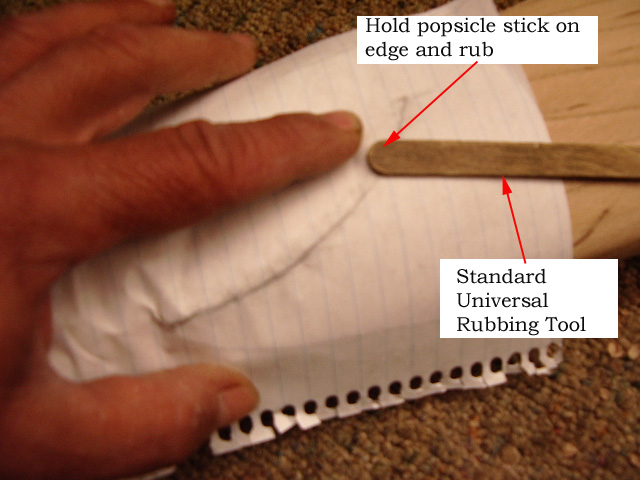 tool
and using the edge of the tool I rub the paper along the lines. This will
transfer the graphite from the pencil directly to the stock. Remove the
paper and redefine the the lines again, using your pencil.
tool
and using the edge of the tool I rub the paper along the lines. This will
transfer the graphite from the pencil directly to the stock. Remove the
paper and redefine the the lines again, using your pencil.
Once
this has been done, using files carefully remove wood 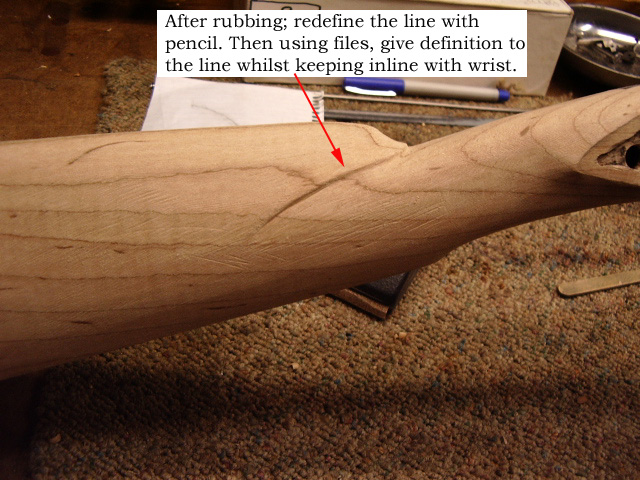 along
the bottom edge of the line to allow the wrist to stand out, yet still keep it's
definition with the flow of the wrist. What you are really trying to do at this
point is define the front of the comb and not so much the line passing down the
side of the stock.
along
the bottom edge of the line to allow the wrist to stand out, yet still keep it's
definition with the flow of the wrist. What you are really trying to do at this
point is define the front of the comb and not so much the line passing down the
side of the stock.
Now you can use your round files and carefully shape the front of the comb itself.
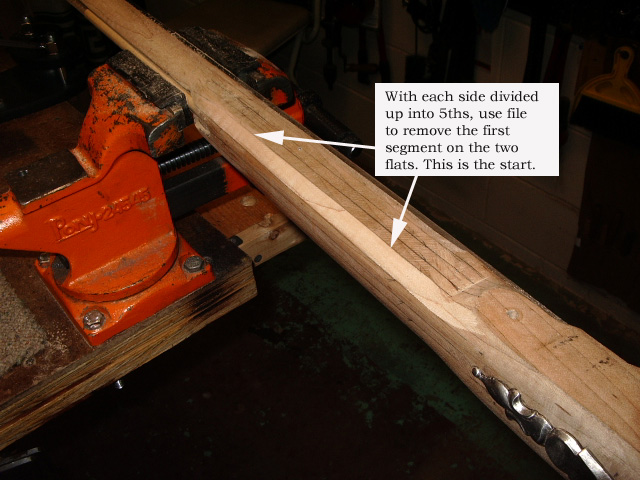
I
now want to add the trigger guard, but can not until I shape the forearm area
where the guard 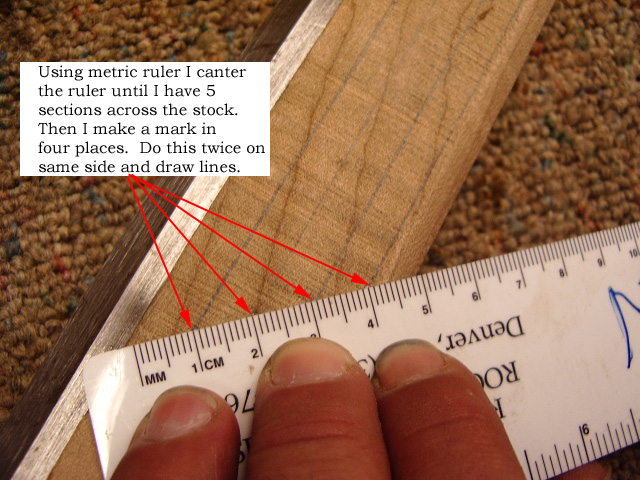 will
rest. To do this I divide the three sides of the forearm into 5ths. I do
this with a metric ruler. This works well for me because I can divide
areas up much easier.
will
rest. To do this I divide the three sides of the forearm into 5ths. I do
this with a metric ruler. This works well for me because I can divide
areas up much easier. 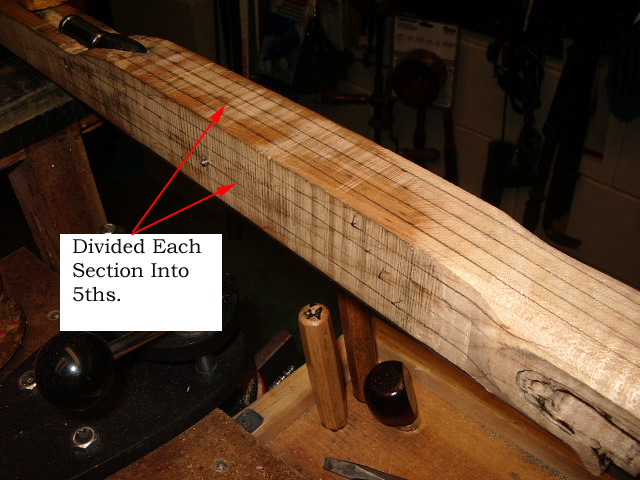
I do this to all three sides of the forearm.
With
the lines defined on all three sides, I take my #49 bastard file and create a
chamfered edge from one line down to one line in from the side. This is done
along the entire edge, except near 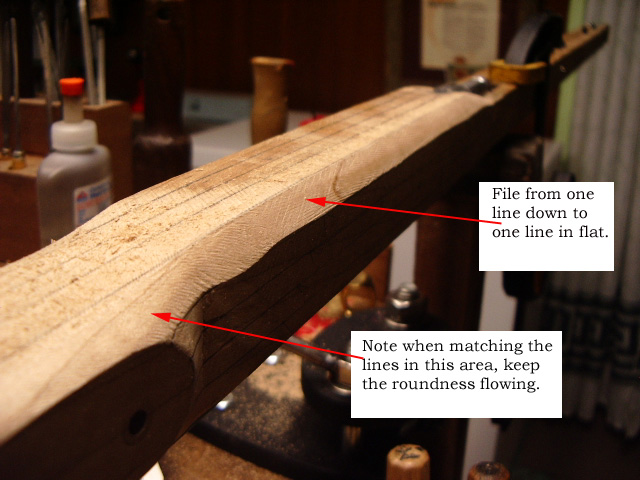 the
lock or side plate panel. In these areas I gently roll the edge.
the
lock or side plate panel. In these areas I gently roll the edge.
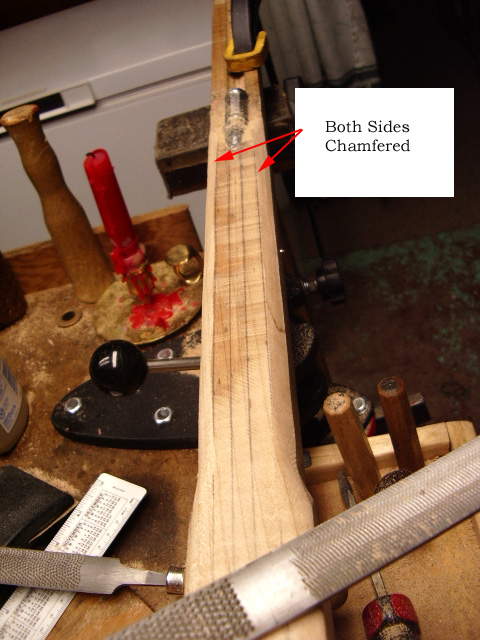
Here you can see both sides chamfered.
Now you can start filing and rolling toward the center lines similar to how the wrist above was shaped.
Then
I divided the belly into 7 segments and repeated the process. 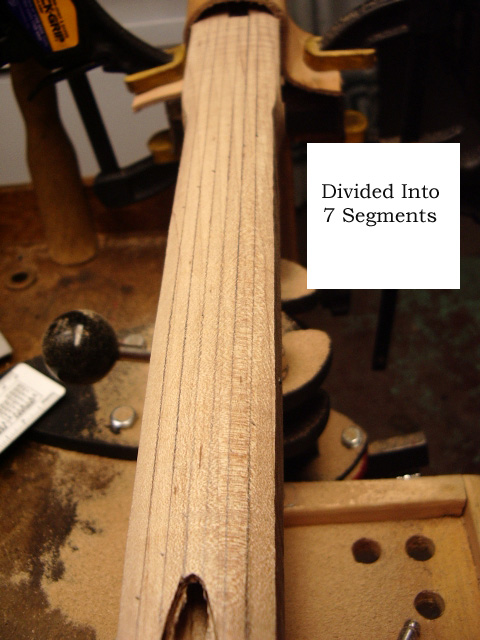
This is how one side looked after rounding one side.

With
both sides finished, now I will work on the inletting work for the Trigger
Guard.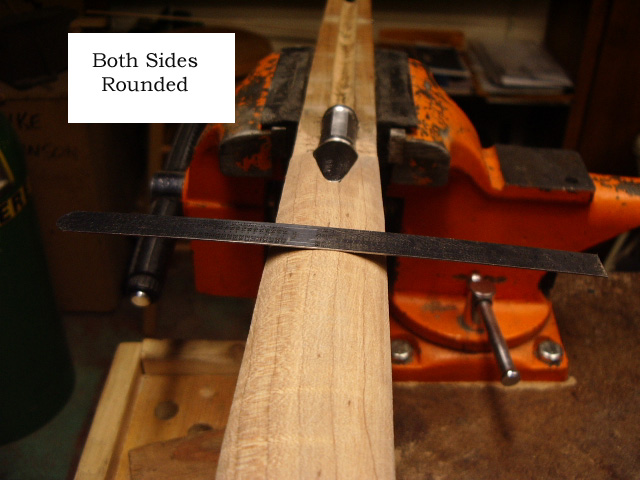
After you have done the belly, work on the sides, but along the barrel you will want to remove the barrel so as not to scratch it with the file. Note, you want to keep at least 1/16" of an edge along the barrel for now. Once this is done, then the three sides are divided into 7ths and repeat the process again. With the bottom of the forearm rounded, I'll install the trigger guard. See Trigger Guard for more information.
 Having
just finished installed the patchbox lid into the butt,
Having
just finished installed the patchbox lid into the butt, 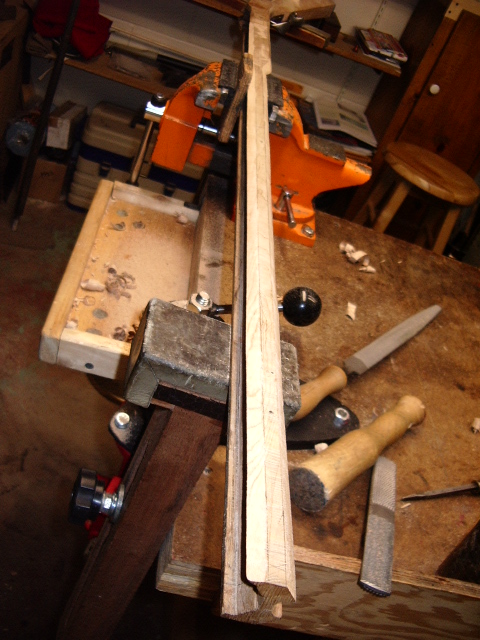 I
will divide out the forearm width into 3 segments. Then I will file off along
the bottom along the ramrod channel on both sides.
I
will divide out the forearm width into 3 segments. Then I will file off along
the bottom along the ramrod channel on both sides.
Now
I will divide the width into 5ths. I use a clamp sometimes to help me hold the
ruler on one end so I can draw my liners easier. 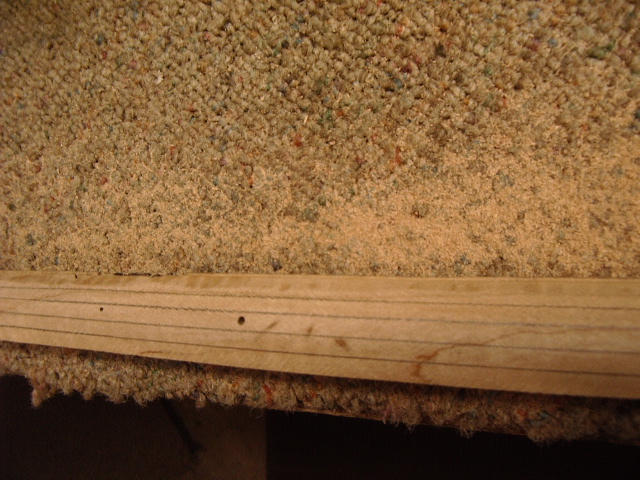
 Here
is the stock with the lines drawn on the sides.
Here
is the stock with the lines drawn on the sides.
Once I have the lines marked out, I use a small bastard file and will file from the top inward toward the line. I roll the file so as to push the wood toward the line until the line disappears. I continue doing this one line at a time along the length of the stock, then proceed onto the next line till I am in the middle. Then I reversed and repeat the process from the bottom. When all I have left is the middle section, I continue to roll the file over the middle section to blend it in. Next I divide the stock into 7ths and repeat the process again. Once each side is done, examine the stock to see if the sides are an even thickness.
 This is how it looks.
I
wanted to have a pumpkin roundness to the sides, which will blend into the sides
of the middle forearm when I shape this section.
This is how it looks.
I
wanted to have a pumpkin roundness to the sides, which will blend into the sides
of the middle forearm when I shape this section.
 On
the main forearm section I divided the sides of the forearm into 5ths and then
7ths. Each time using my file I rounded over each line. This was done to all
three sides similar to what was done in the aforementioned sections above. When
I finished, the sides were rounded nicely.
On
the main forearm section I divided the sides of the forearm into 5ths and then
7ths. Each time using my file I rounded over each line. This was done to all
three sides similar to what was done in the aforementioned sections above. When
I finished, the sides were rounded nicely.
With
this done, I decided to put incised lines on either side of the ramrod channel.
The lines were eyeballed to be 3/5 down the side of the forearm and the lines
were parallel to the ramrod channel. Could not make the lines parallel to
the upper edge of the stock due to the barrel being swamped. This would of given
uneven lines on either side of the channel. With a sharp knife, I cut
three passes along the lines. In the area near the rear ramrod thimble I
followed the contour of this area to allow for a tapering effect which matched
the tapering done on the comb area of the butt of the stock. You will see what I
mean later in the photos below. 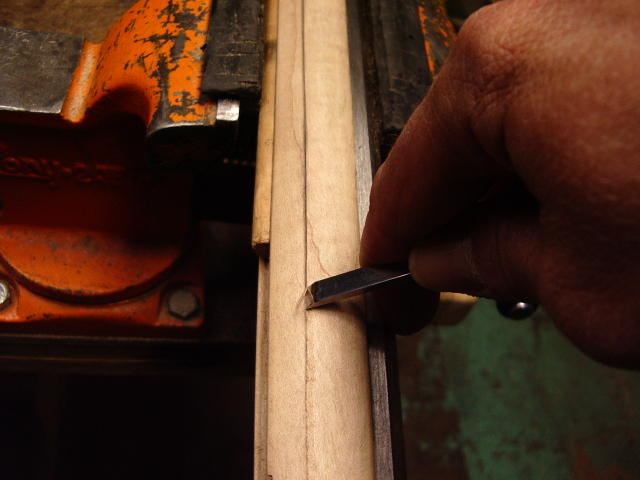
Once the lines were cut, I used a chisel to cut into the line from above the line down into the cut. This was done for the entire length of the cut to remove the wood.
 When
finished you now have a defined edge above the line.
When
finished you now have a defined edge above the line.
Using
a flat riffler file I smoothed this area above the line to take out any chisel
marks and rounded the upper portion to blend into the stock. 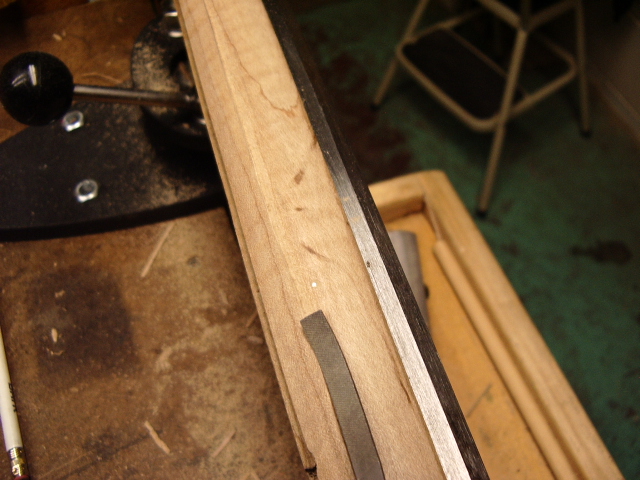
 Measuring
down 3" from the muzzle make a mark. This will be where the end of the ram
rod channel will end. The sides of the ram rod channel are taken down to the
depth of the channel all the way to the muzzle.
Measuring
down 3" from the muzzle make a mark. This will be where the end of the ram
rod channel will end. The sides of the ram rod channel are taken down to the
depth of the channel all the way to the muzzle.
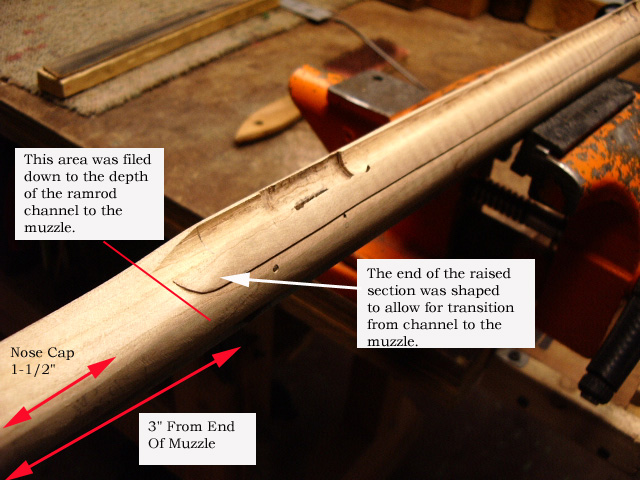 Although
the photo indicates a 1-1/2" nose cap, I changed my mind and the cap will
be 1-5/16" long. This ended up looking more in portion to the rifle.
At this point I used several grades of sand paper to smooth the wood surface
along the incised lines and the stock.
Although
the photo indicates a 1-1/2" nose cap, I changed my mind and the cap will
be 1-5/16" long. This ended up looking more in portion to the rifle.
At this point I used several grades of sand paper to smooth the wood surface
along the incised lines and the stock.
 Here
is an idea what the rear thimble area looks like.
Here
is an idea what the rear thimble area looks like.
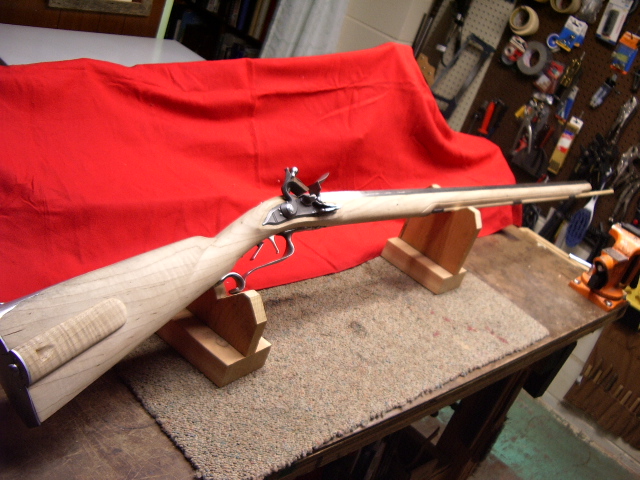 Here
are few of photos of the rifle in it's current state.
Here
are few of photos of the rifle in it's current state.


Came back and decided to put an incised line along the bottom of the butt stock leading up to the trigger guard. By doing so, this will make the butt look narrower and and flows with the incise line running down the forearm along the ramrod channel.
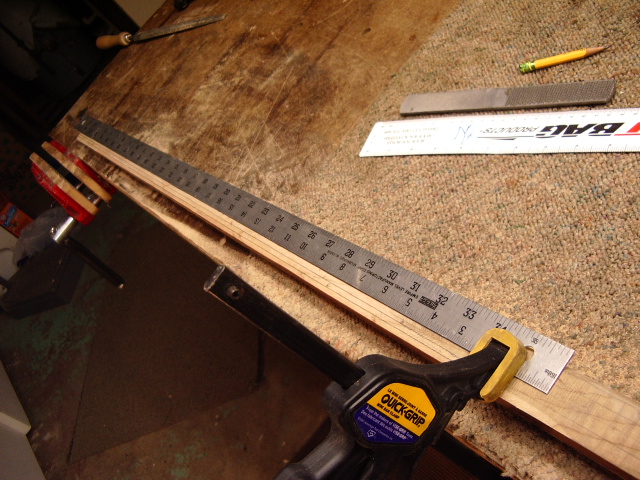
I made a mark 5/16" up from the bottom of the toe plate and another mark 1/4" from the bottom of the stock at the trigger guard.
Then
I drew a straight line from mark to mark on both sides of the stock. Next I
connected both lines across the stock under the  trigger
guard to mate the two line together. Using my knife, I cut into the stock along
this line and made about 3-4 passes with the knife. Then using my 5/16"
chisel, I cut down ward with the knife to the line about 3/6" above the
line.
trigger
guard to mate the two line together. Using my knife, I cut into the stock along
this line and made about 3-4 passes with the knife. Then using my 5/16"
chisel, I cut down ward with the knife to the line about 3/6" above the
line.
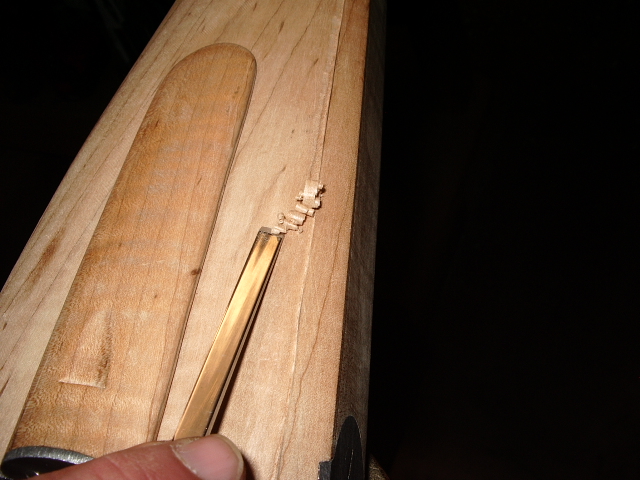
Then I came back and shaved the wood up to 3/8" above the line to smooth the transition of the stock to the line.
 I
then repeated this on the other side. Use sandpaper to smooth the stock and
basically erase any chisel marks or high spots.
I
then repeated this on the other side. Use sandpaper to smooth the stock and
basically erase any chisel marks or high spots.

At the buttplate, use a triangular file to file the notch in the plate to match up with the incise line and this causes the lower molding to stand out more.
When finished, the molding blends in nicely when you finish going across the stock at the trigger guard to mate up the two sides.
 I'll
add a line across the cheekpiece parallel to this line later.
I'll
add a line across the cheekpiece parallel to this line later.
Here
is a closer photo of the trigger guard area. 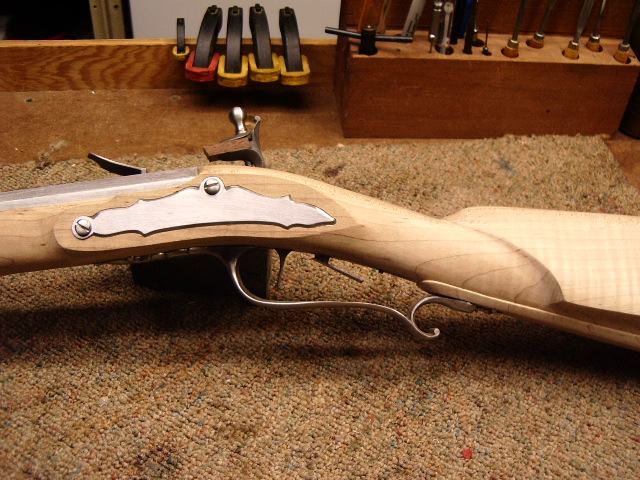
Hoot AL Rifle Shop
If you like the site or have any questions, drop me a line by clicking on "Hoot" below.

(c)
Copyright 2005. All Rights Reserved.