Flash Hole Liner Installation:
Installing a flashliner into a barrel requires a determination of where the flash pan positioned, the end of the breech plug in the barrel and the width of the barrel flat.
If the lock is positioned forward slightly, then the flashliner will be just ahead of the breech plug. To find out whee the face of the breech plug is, drop a rod down the barrel and then mark on the side of the dowel where the end of the barrel is. Then remove the dowel and lay it along the outside of the barrel and align the mark with the end of the barrel. The other end of the dowel will indicate where the face of the breech plug is. In the example below, the breech plug face is even with the location of the flashliner hole I want to put in. This puts the hole center of the pan, yet slightly above the pan.
Important!! At this point Remove the Breech Plug From The Barrel.
Once I determine where the center of the hole will be on the barrel, I center
punch it and drill the hole. In this case, I'm installing a "White
Lightning" 5/16" X 18 flash liner. This requires a letter I drill
bit. Initially I drill the hole with a slightly smaller drill bit and then
I use the "I" drill bit. This ensures the hole is the exact sized hole
I need. 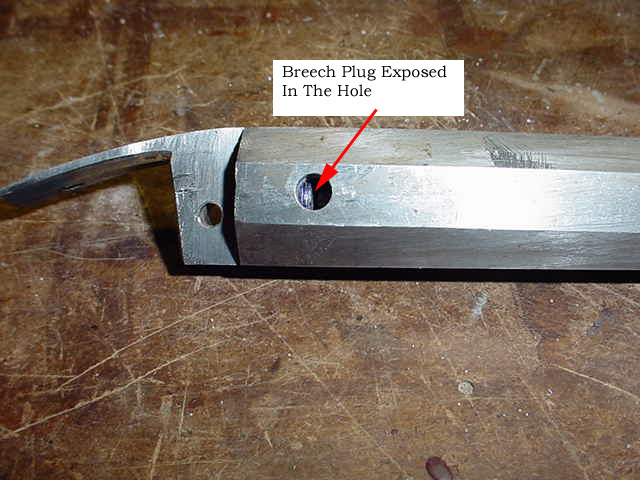 (NOTE:
Click on the photos to enlarge. They will open up in a new
window for you convenience. Then close out the window when you are done.)
(NOTE:
Click on the photos to enlarge. They will open up in a new
window for you convenience. Then close out the window when you are done.)
After the hole is drilled to size, reinstall the breech plug to see where it will shine thru the hole you just drilled. Using a marker, I mark the breech plug.
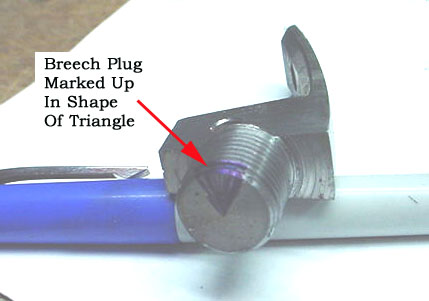 Then
I remove the breech plug. Here I draw out lines to shape a triangle of the cone
I want to file into the face of the breech plug. This will guide the powder
directly into the flashliner when I load my gun. This will also direct
ignition to be directed toward the center of the breech plug face, too.
Then
I remove the breech plug. Here I draw out lines to shape a triangle of the cone
I want to file into the face of the breech plug. This will guide the powder
directly into the flashliner when I load my gun. This will also direct
ignition to be directed toward the center of the breech plug face, too.
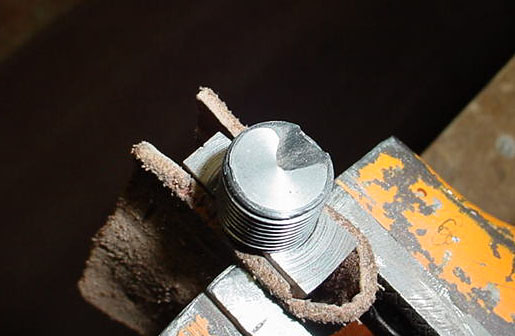
With my round files, I center the cone in the face of the breech plug.
Then I reinstall the breech plug and check to ensure enough of the cone matches the hole in the side of the barrel. Don't remove too much. Try and fit. This may take a few tries.
When satisfied, remove the breech plug from the barrel and set aside.
 Next
I tap the hole in the barrel. Run the tap all the way into the barrel.
Next
I tap the hole in the barrel. Run the tap all the way into the barrel.
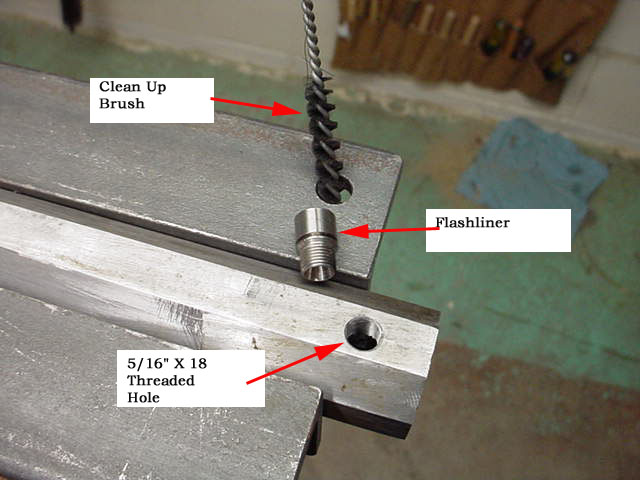
Use a small brush to remove any metal debris from the areas. With your countersink put a very light countersink around the outside edge of the barrel. This will allow the flash liner to seat properly against the barrel.
 Screw
the flashliner into the barrel and finish with a pair of Vise Grips to get the
liner snug into the hole.
Screw
the flashliner into the barrel and finish with a pair of Vise Grips to get the
liner snug into the hole.
Once the liner is tightly screwed into the hole, take your hacksaw and cut the end of the flashliner off at the groove that passes around the perimeter of the liner.
Once the end of the outer end of the flashliner is cut off, file the remainder of the flashliner carefully down to the flat of the barrel. Remember, this is the flat you already inlet your lock down to already, so don't remove too much of your barrel face here.
 Now
look inside the breech end of the barrel to see if the inside of the liner is
exposed. In this case, the liner was shorter than the thickness of this barrel,
and does not protrude into the barrel. If the flashliner does stick up
into the barrel. use a round file and carefully file the liner flush to the
inside of the barrel. Note: Be careful not to damage the breech plug
threads.
Now
look inside the breech end of the barrel to see if the inside of the liner is
exposed. In this case, the liner was shorter than the thickness of this barrel,
and does not protrude into the barrel. If the flashliner does stick up
into the barrel. use a round file and carefully file the liner flush to the
inside of the barrel. Note: Be careful not to damage the breech plug
threads.
If necessary, before putting the breech plug back in, use a bottoming tap and rethread the breech plug again. Use the brush to keep the threads clean of metal debris.
When finished, your flashliner hole should look like this.
If you like the site or have any questions, drop me a line by clicking on "Hoot" below

(c) Copyright 2005. All Rights Reserved.