Inletting The Lock:
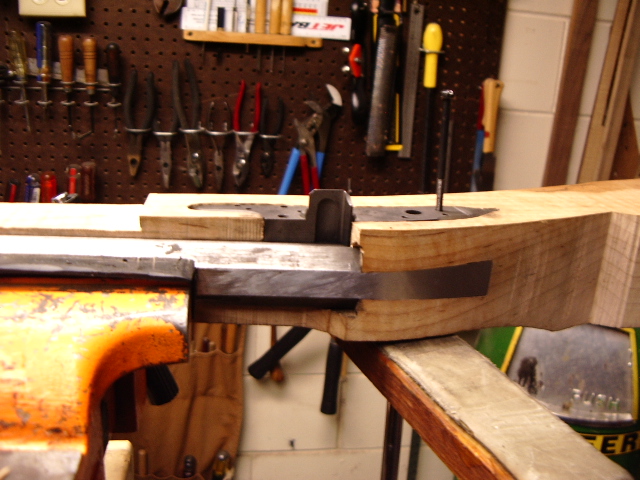
With the barrel now pinned to the stock, the next step was to start inletting the lock plate into the stock. The first step was to determine where the face of the breech plug was in the barrel. It will be at this location I want to center the flashliner. With a pencil mark on the barrel, I centered the pan of the lock on this line and then rotated the lock until the front bolster of the lock was flush with the side wall of the stock. This makes for an even line from the stock along the barrel into the lock.
 Here
I inlet the bolster deep enough to set the lock into it and then cut a tracing
line around
Here
I inlet the bolster deep enough to set the lock into it and then cut a tracing
line around the lock panel. A clamp was used to hold the lock in position for this
operation. Once I had the pattern of the lock in the stock, I then removed all
the wood in the bolster area down to the barrel.
the lock panel. A clamp was used to hold the lock in position for this
operation. Once I had the pattern of the lock in the stock, I then removed all
the wood in the bolster area down to the barrel.
 Then using candle black on the lock plate I continued to inlet the lock down
until the bols
Then using candle black on the lock plate I continued to inlet the lock down
until the bols ter
of the lock made a flush contact with the side of the barrel. This makes for a
tight fit of the lock to the barrel. In the process of inletting the lock, you
will notice I used a 8x32 bolt into the sear hole to aide in the removal of the
lock plate from the stock. Ideally, you can make yourself a simple tool by
making a knob out of wood and have a 8x32 bolt epoxied into it to screw into the
lock for a better handle. I need to make me one of those items, I reckon.
ter
of the lock made a flush contact with the side of the barrel. This makes for a
tight fit of the lock to the barrel. In the process of inletting the lock, you
will notice I used a 8x32 bolt into the sear hole to aide in the removal of the
lock plate from the stock. Ideally, you can make yourself a simple tool by
making a knob out of wood and have a 8x32 bolt epoxied into it to screw into the
lock for a better handle. I need to make me one of those items, I reckon.
 As
you can see, the lock is not flush up against the barrel. Note, the barrel is
tapered. For this reason the front of the lock is deeper in the wood than
the tail of the lock plate. This is normal. When you finish the side panel, it
will have a taper toward the front of the rifle and this will need to be
repeated on the other side of the rifle on the sideplate side.
As
you can see, the lock is not flush up against the barrel. Note, the barrel is
tapered. For this reason the front of the lock is deeper in the wood than
the tail of the lock plate. This is normal. When you finish the side panel, it
will have a taper toward the front of the rifle and this will need to be
repeated on the other side of the rifle on the sideplate side.
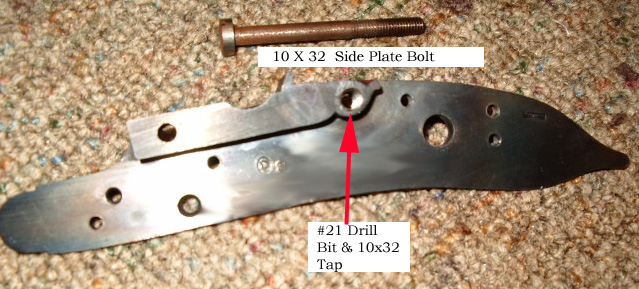
The location for the side plate bolt into the lock was located at the rear of the lock bolster. The hole was drilled out with a #21 drill bit for a 10 X 32 bolt. Then the side plate was drilled first. The lock plate was then reinserted into the stock. Using the hole drilled into the lock, I used this as a pilot hole for drilling thru the stock, the tang and out the other side of the stock.
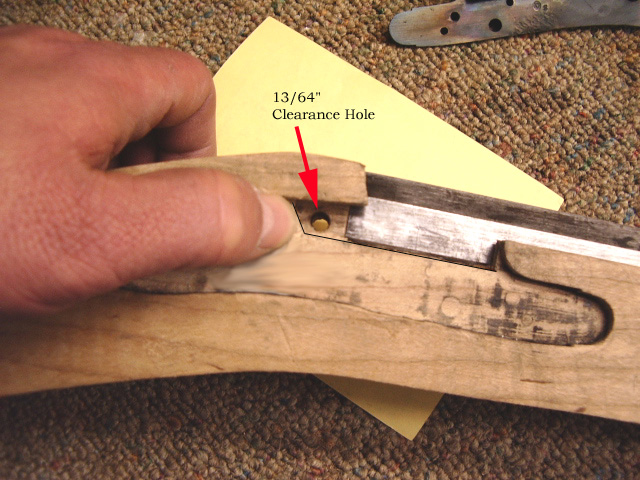
Next I removed the lock and then drilled a 13/64" clearance hole only
thru the stock and the barrel tang.
Reinserted the lock plate. Using a 10 X 32 tap, thru the side plate side, I
tapped into the hole on the lock bolster. Since the tap is too short to go all
the way thru at once, I tapped as far as I could and then removed it and the
lock plate. Placed the tap back into the hole and finished the tapping of the
bolster. 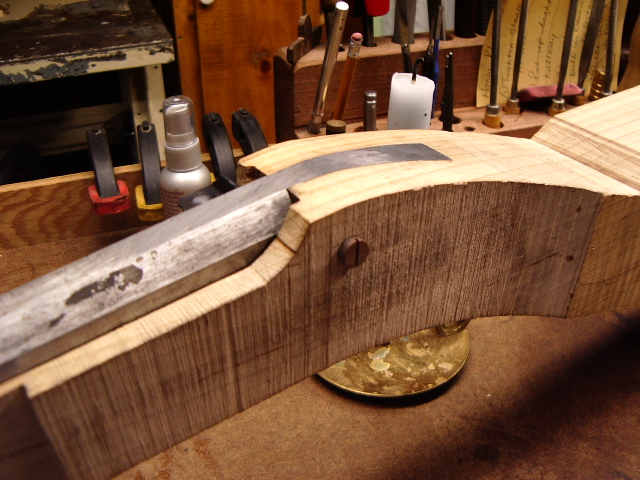
Now I'm ready to start inletting the workings of the lock into the stock.
With the lock plate in the stock, use
a sharp pencil and make circular marks inside the two screw holes for the bolts
that secure the stirrup to the lock panel.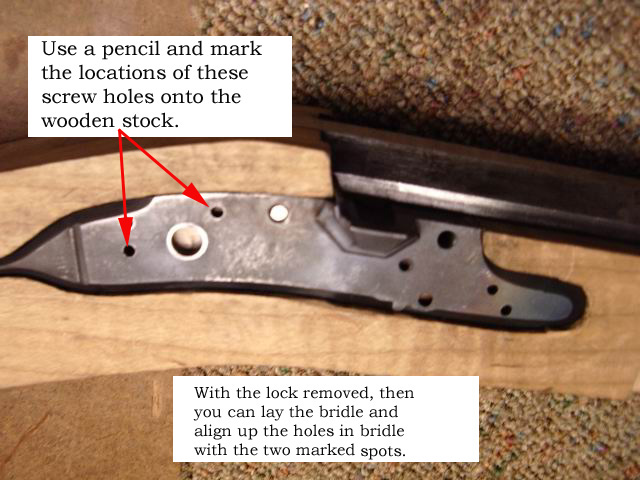
 I
then trace around the stirrup and inlet the stirrup down into the stock. Once I
have this flush, I place the tumbler into the stirrup and draw a rough circular
area to allow clearance of the tumbler inside the inletted stirrup
area.
I
then trace around the stirrup and inlet the stirrup down into the stock. Once I
have this flush, I place the tumbler into the stirrup and draw a rough circular
area to allow clearance of the tumbler inside the inletted stirrup
area.

Then
I put the bolts into the stirrup along with the tumbler into the inletted hole.
This allows me place the sear on top of the sear mounting bolt and allow me to
judge where the sear hole will need to be drilled inside the lock plate area.
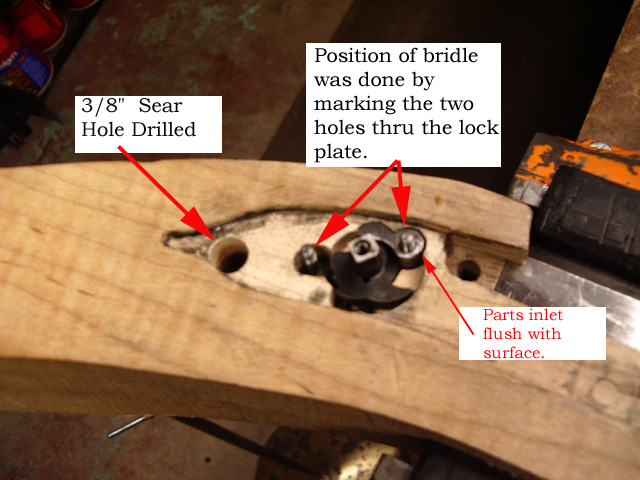
Once identified, I drill a 3/8" hole the depth of the sear arm. The hole is
positioned as close to the edge as possible without damagin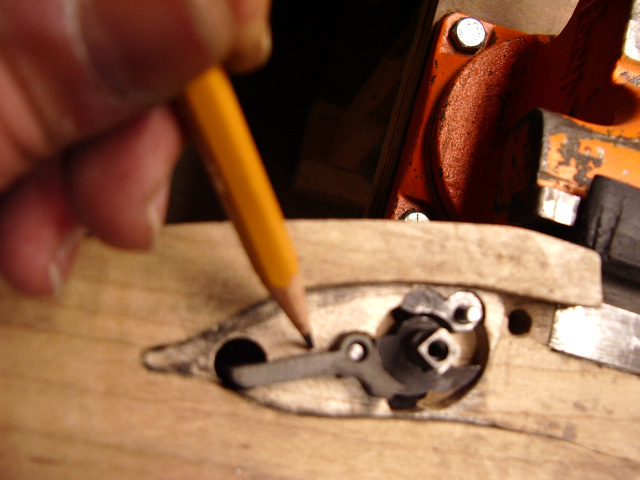 g the outer inlet
wall of the lock plate. With the hole drilled, I can flip the sear over and lay
it on top of the mounting bolt. Now I can trace the wood to be removed to
inlet the sear into the stock. Rotate the tumbler and this will show you the
full up and down travel of the sear as it pivots. Remove this travel path.
g the outer inlet
wall of the lock plate. With the hole drilled, I can flip the sear over and lay
it on top of the mounting bolt. Now I can trace the wood to be removed to
inlet the sear into the stock. Rotate the tumbler and this will show you the
full up and down travel of the sear as it pivots. Remove this travel path.
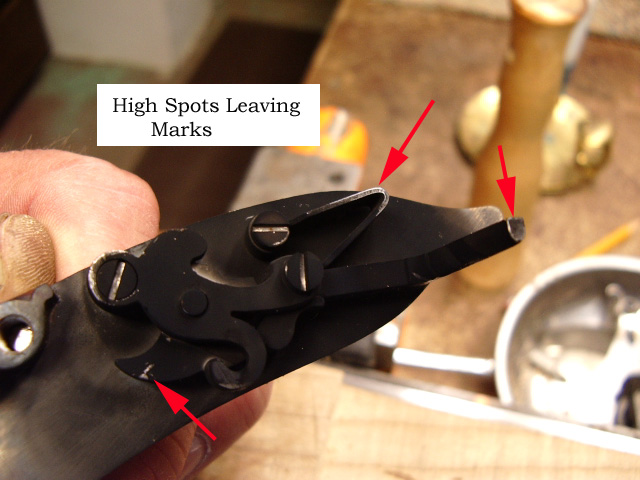
 Once
this wood is removed to depth (thickness of the sear), I mount everything to
the lock plate and then blacken it with candle soot. Position the lock into the
lock mortise and tap it with a wooden mallet. This will leave marks where metal
and wood meet. Or, basically it it pointing out to you the high spots in the wood that must be removed yet.
Once
this wood is removed to depth (thickness of the sear), I mount everything to
the lock plate and then blacken it with candle soot. Position the lock into the
lock mortise and tap it with a wooden mallet. This will leave marks where metal
and wood meet. Or, basically it it pointing out to you the high spots in the wood that must be removed yet.

Another way to see these same marks to verify you have captured them all is to look at the lock you just removed and look for shinny areas where the soot has been removed.
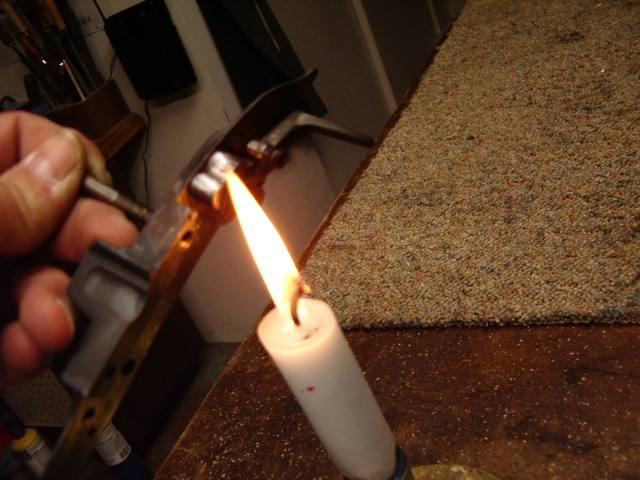
 With all the high spots
removed, reinsert the lock into the lock mortise. Place the hammer onto the lock
and position the hammer in the forward position. Re-soot the lock and insert the
lock into the mortise and then cock the hammer into the Safety position feeling
for any stiffness. If you feel resistance, remove the lock and remove the black
marks. Start again and then cock the hammer into the Firing position.
With all the high spots
removed, reinsert the lock into the lock mortise. Place the hammer onto the lock
and position the hammer in the forward position. Re-soot the lock and insert the
lock into the mortise and then cock the hammer into the Safety position feeling
for any stiffness. If you feel resistance, remove the lock and remove the black
marks. Start again and then cock the hammer into the Firing position.
The next step was inletting the main spring.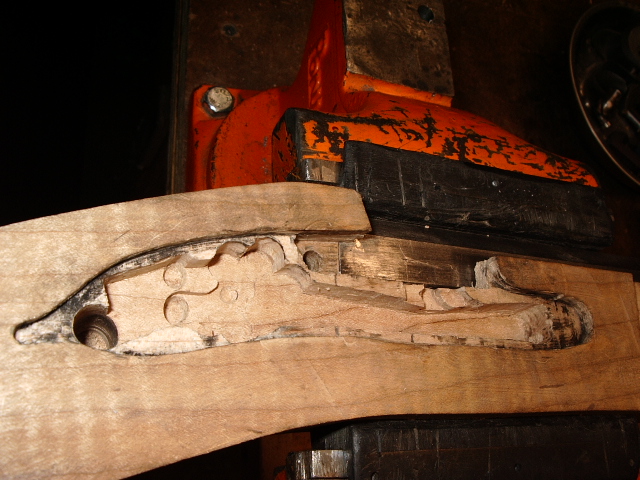
Black soot from the
candle laid out the pattern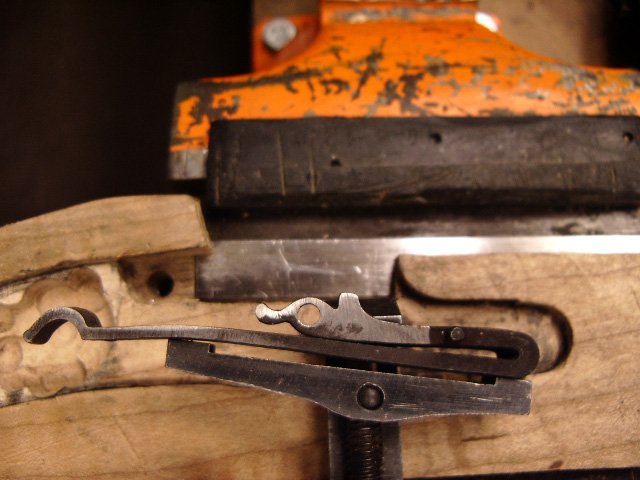 of the lock in the various positions; then the wood
was removed in layers for a good fit with minimal amount of wood loss.
of the lock in the various positions; then the wood
was removed in layers for a good fit with minimal amount of wood loss.
To
locate the front lock bolt, I use a homemade depth gauge to determine the
depth of the barrel and transfer this mark to the outside of the stock in the
lock inletted area. Then insert the depth gauge into the hole leading into
the ramrod channel. This will tell you how deep the channel is.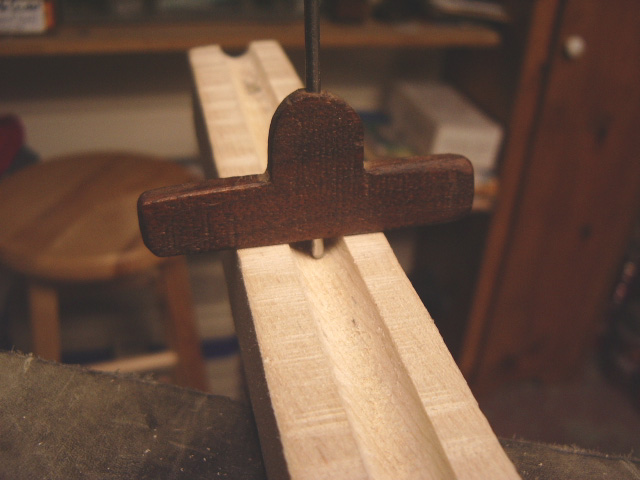
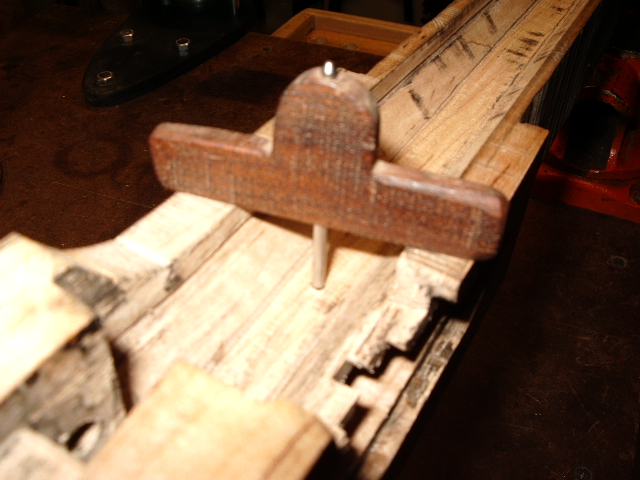
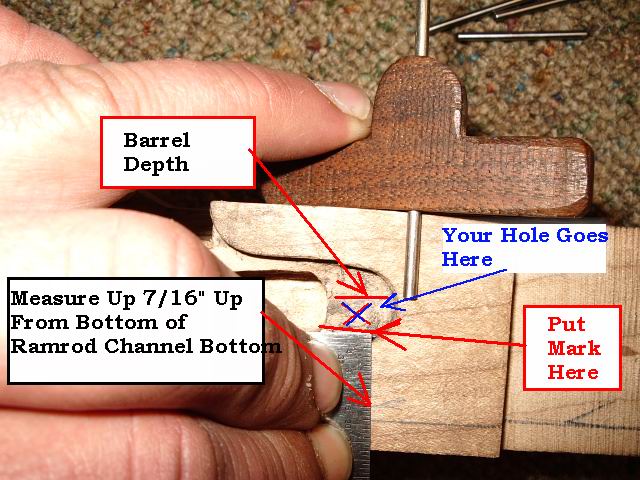
Once I know this information, I can mark out the location to put my front lock bolt.
I will measure this exact location inside the lock cavity and then transfer this to the lock plate.
 Drill a hole in
the lock plate and then use this hole as a pilot hole to drill thru the stock to
the other side.
Drill a hole in
the lock plate and then use this hole as a pilot hole to drill thru the stock to
the other side. 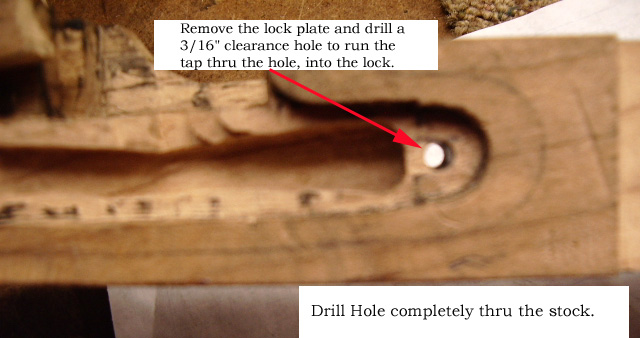
Then the lock is removed and a clearance hole is drilled thru the stock. Lock plate is reinstalled, and a tap is inserted from the other side of the stock into the lock plate. I'll try to have some photos for you on this.
Hoot AL Rifle Shop
If you like the site or have any questions, drop me a line by clicking on "Hoot" below.

(c)
Copyright 2005. All Rights Reserved.